Configure CI/CD pipelines for NodeJs Applications with Azure DevOps
Use Azure DevOps pipelines to build and test Node.js apps, and then deploy or publish to azure app service. The following are the steps to be performed for a complete CI/CD workflow.
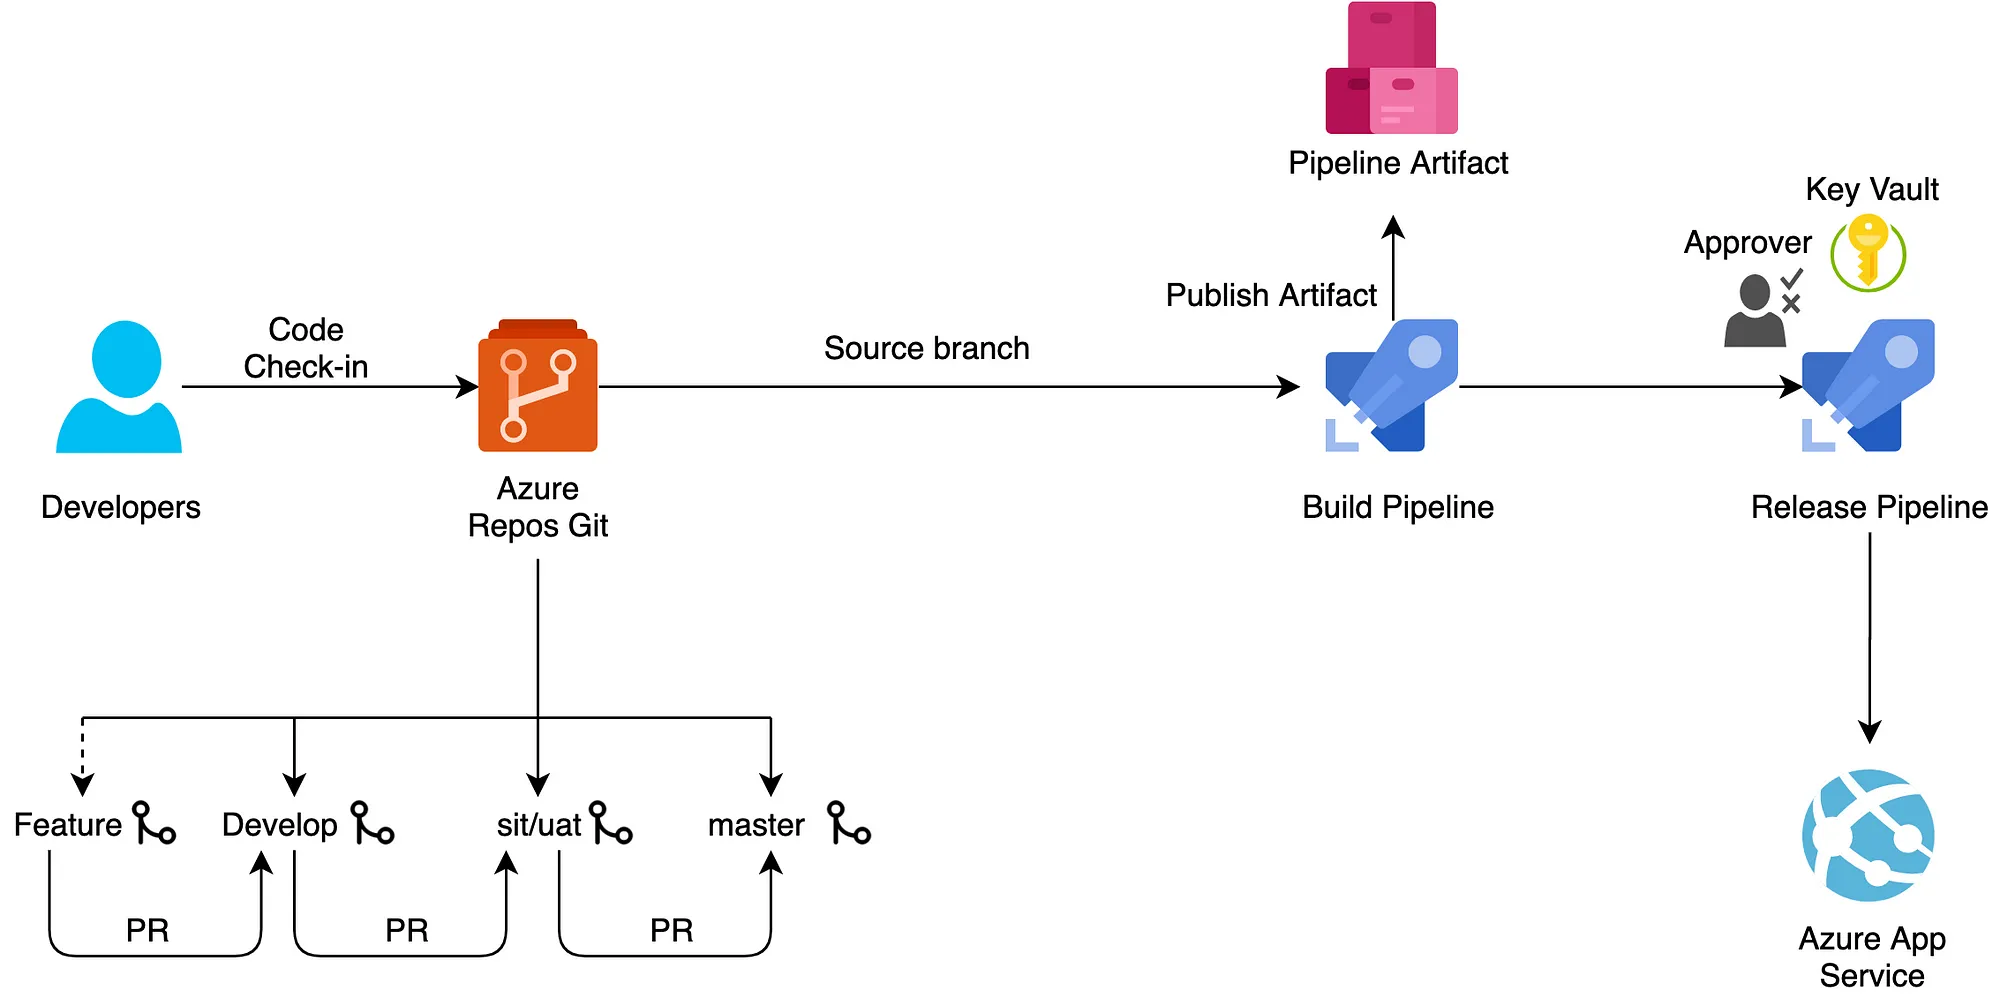
1. Develop and commit your code in the development branch.
2. Push code from the development branch to → test branch → master branch.
3. Deploy your code in different environments; Dev →Test →Prod using CI/CD pipelines in Azure DevOps.
Create a Build Pipeline
Go to dev.azure.com/{organisation-name} → Select Project →Pipelines
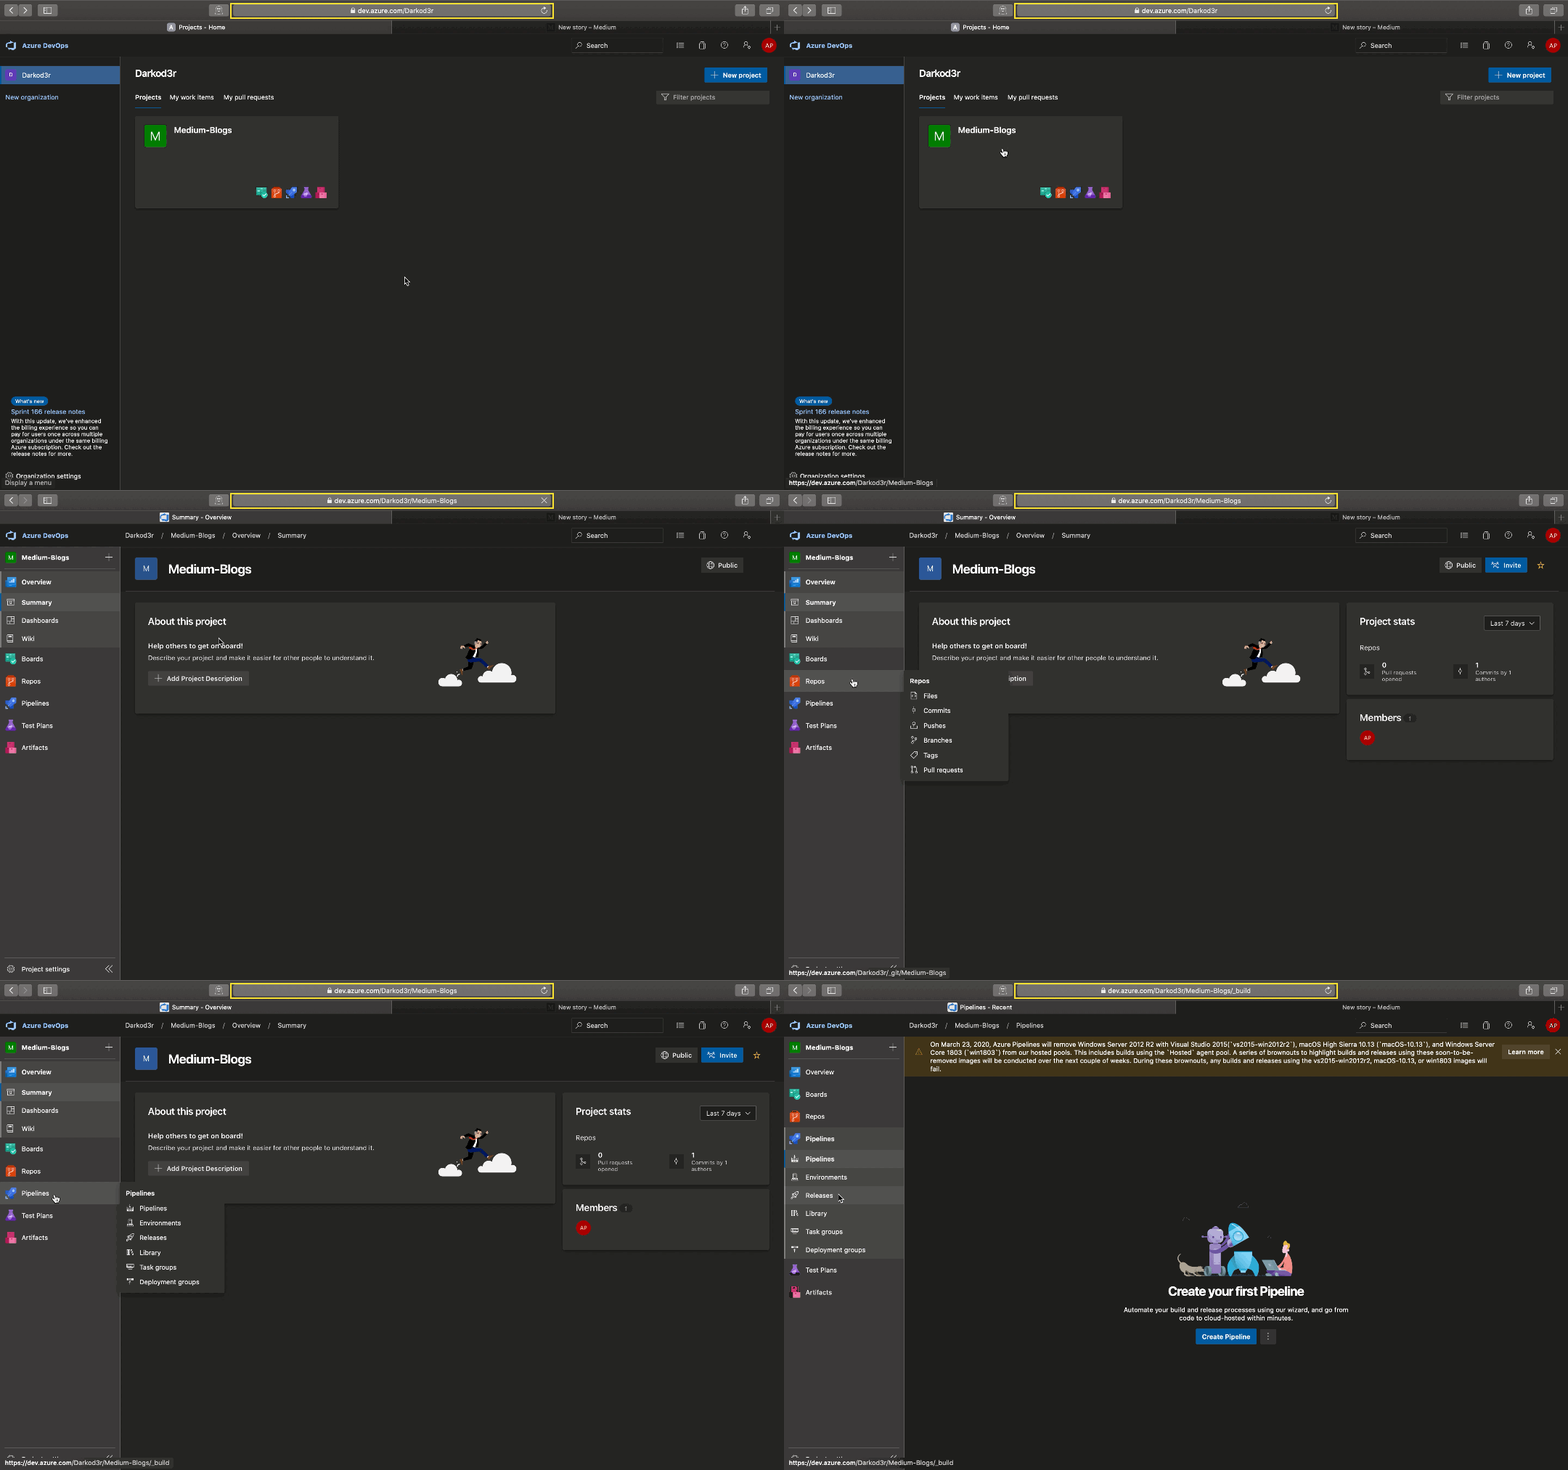
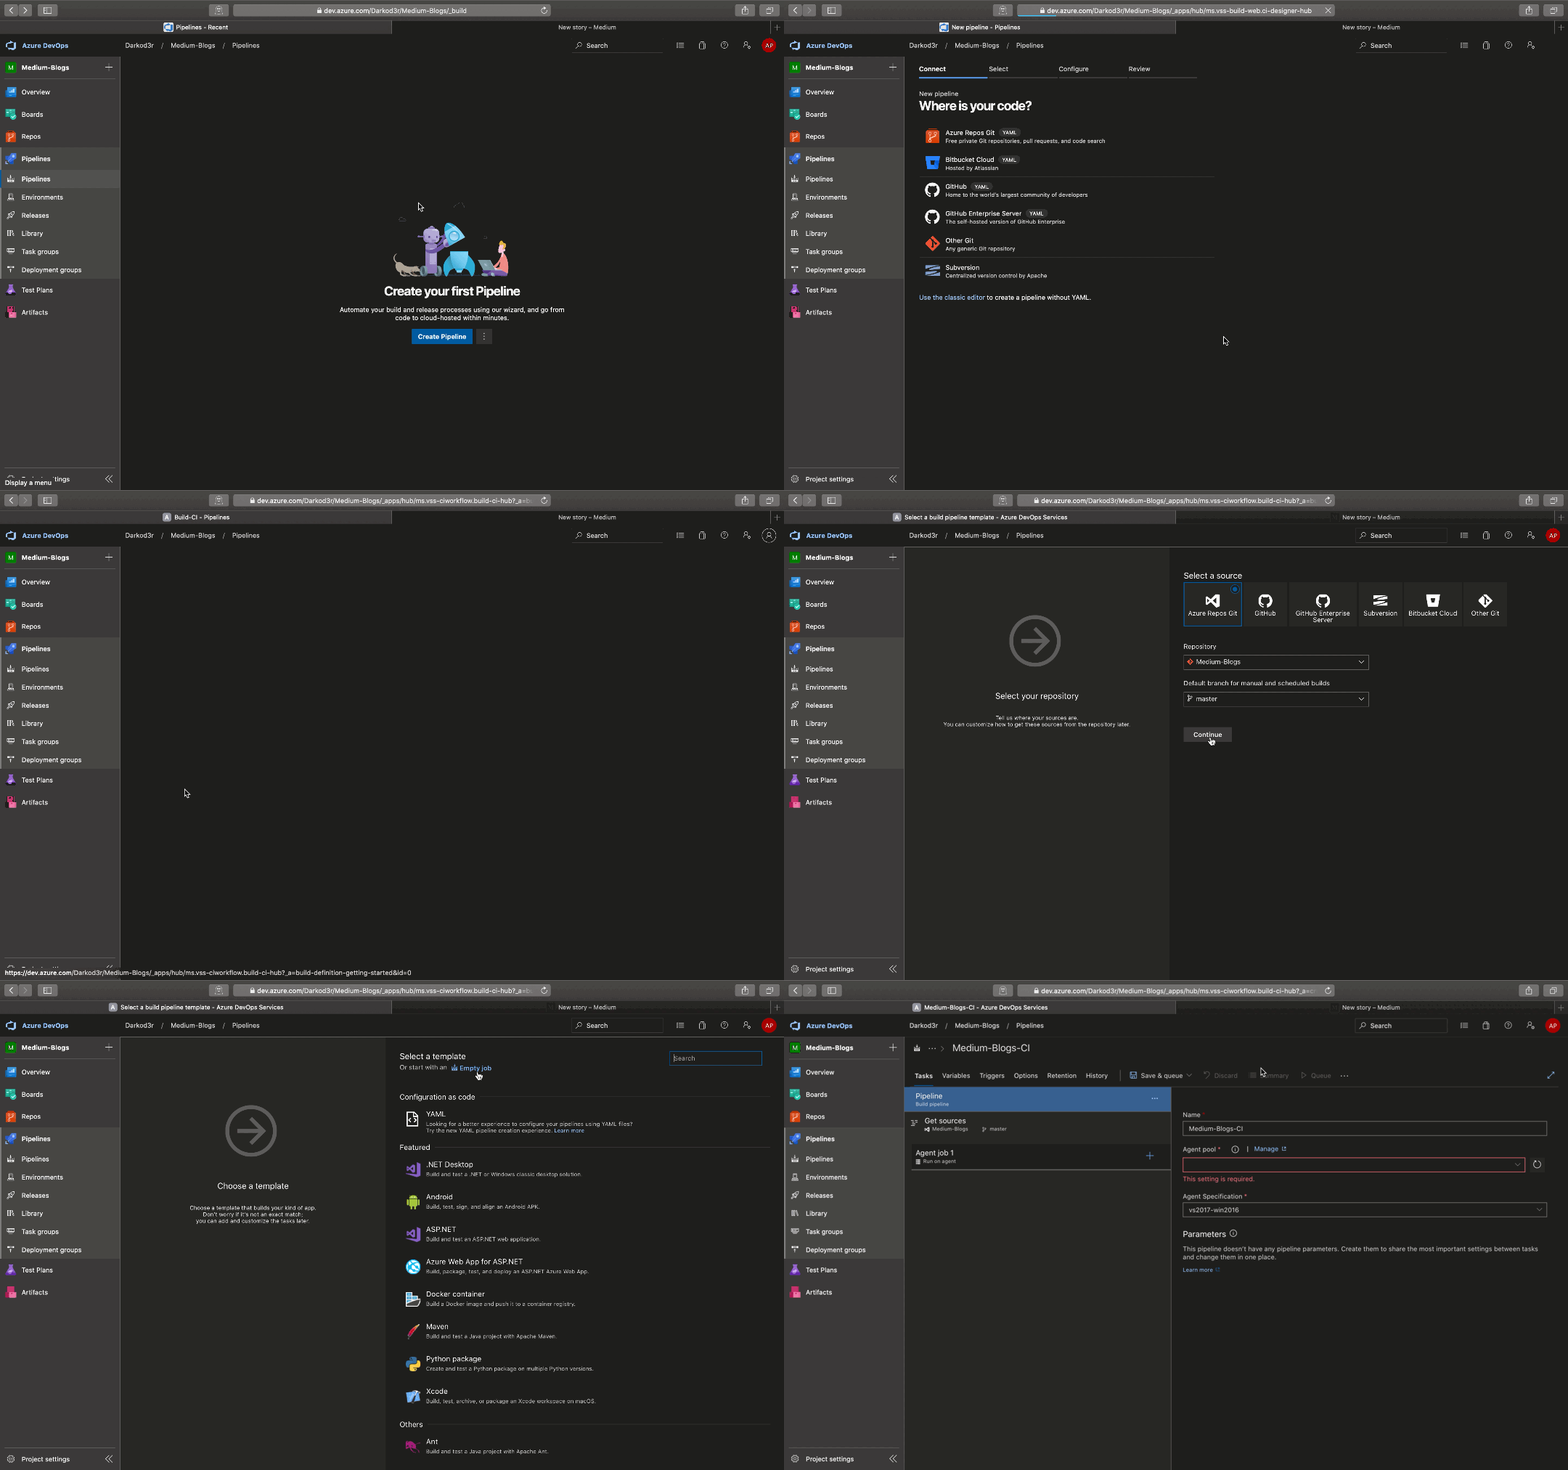
Create New Pipeline → Use Azure Git Repos (YAML) for creating a pipeline as code or use the classic editor for creating a pipeline from the visual designer. For this tutorial, we will be using the classic editor.
Select a source repo → Select Project Name → Select Repository → Select Branch Name → Click on Continue.
Select the template as an Empty Job.
Change the name of the build pipeline as per the naming convention of your organization→ Select Agent Pool as per requirement { Hosted vs2017-win2016 for Windows Environment & Hosted Ubuntu 18.04 for Linux based environment }.
Think of these agents as Virtual Machines with different OS flavors.
Prefer to use Microsoft Hosted Agents instead of Self Hosted Agents unless you know what you are doing
Select Tag Sources → on success to create git tags whenever your build gets succeeded. You can keep the tag format as $(build.buildNumber) or v$(build.buildNumber).
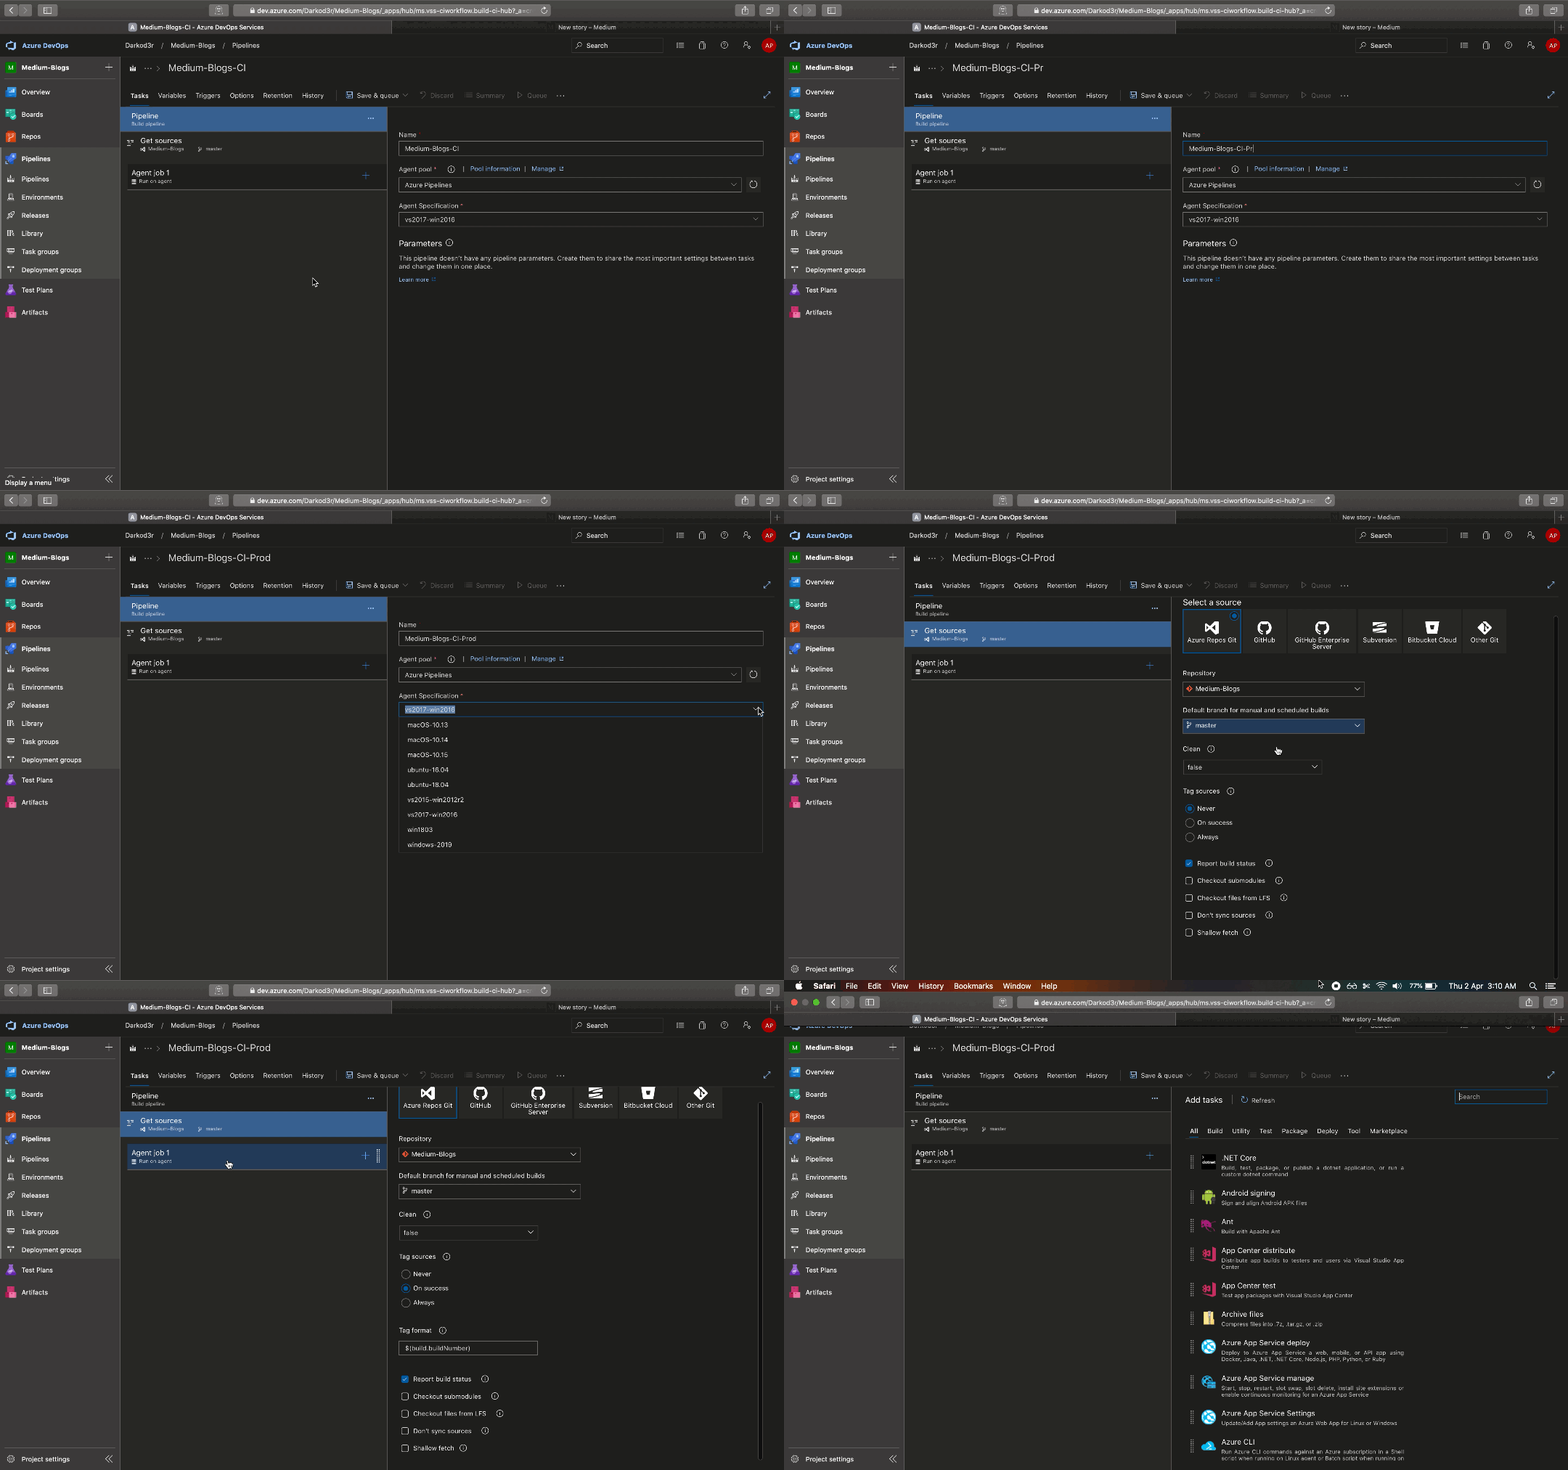
Click on Add Tasks(+) → search for task →Add Task
You can add multiple tasks.
If a task is not available in your organization, you can install it from Marketplace.
Task Details
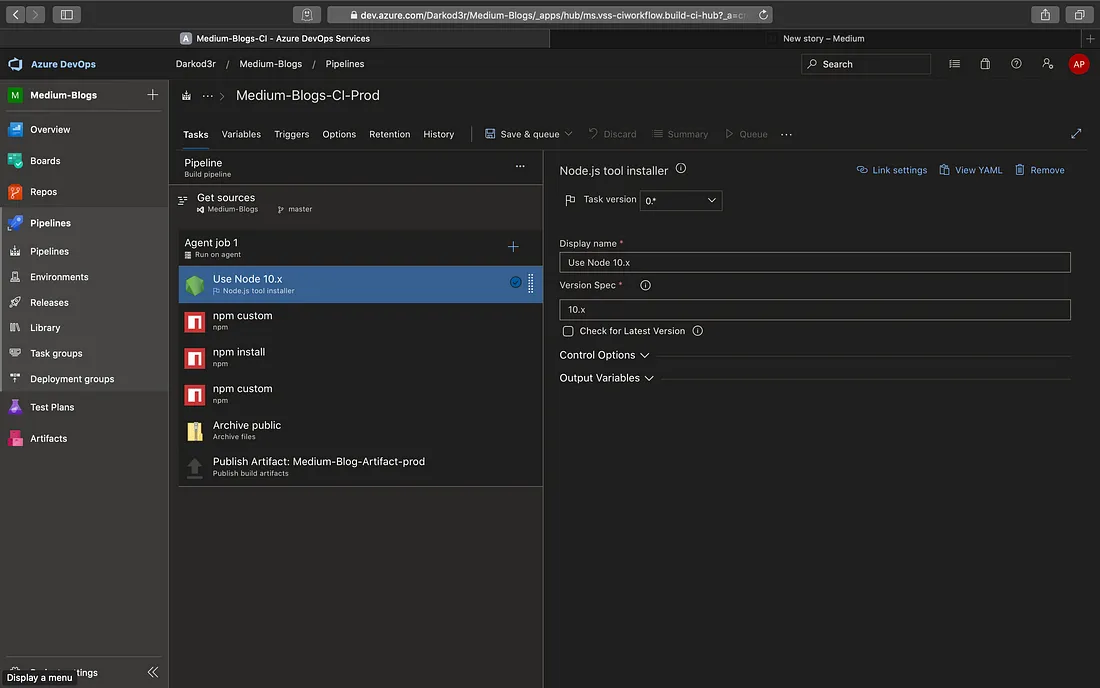
NodeJS tool Installer- Finds or downloads and caches the specified version spec of Node.js and adds it to the PATH
The latest LTS Node version is already installed on the agent and is managed by Microsoft. If you are using a specific version of Node in your project then use this task to specify the exact version you want to use.
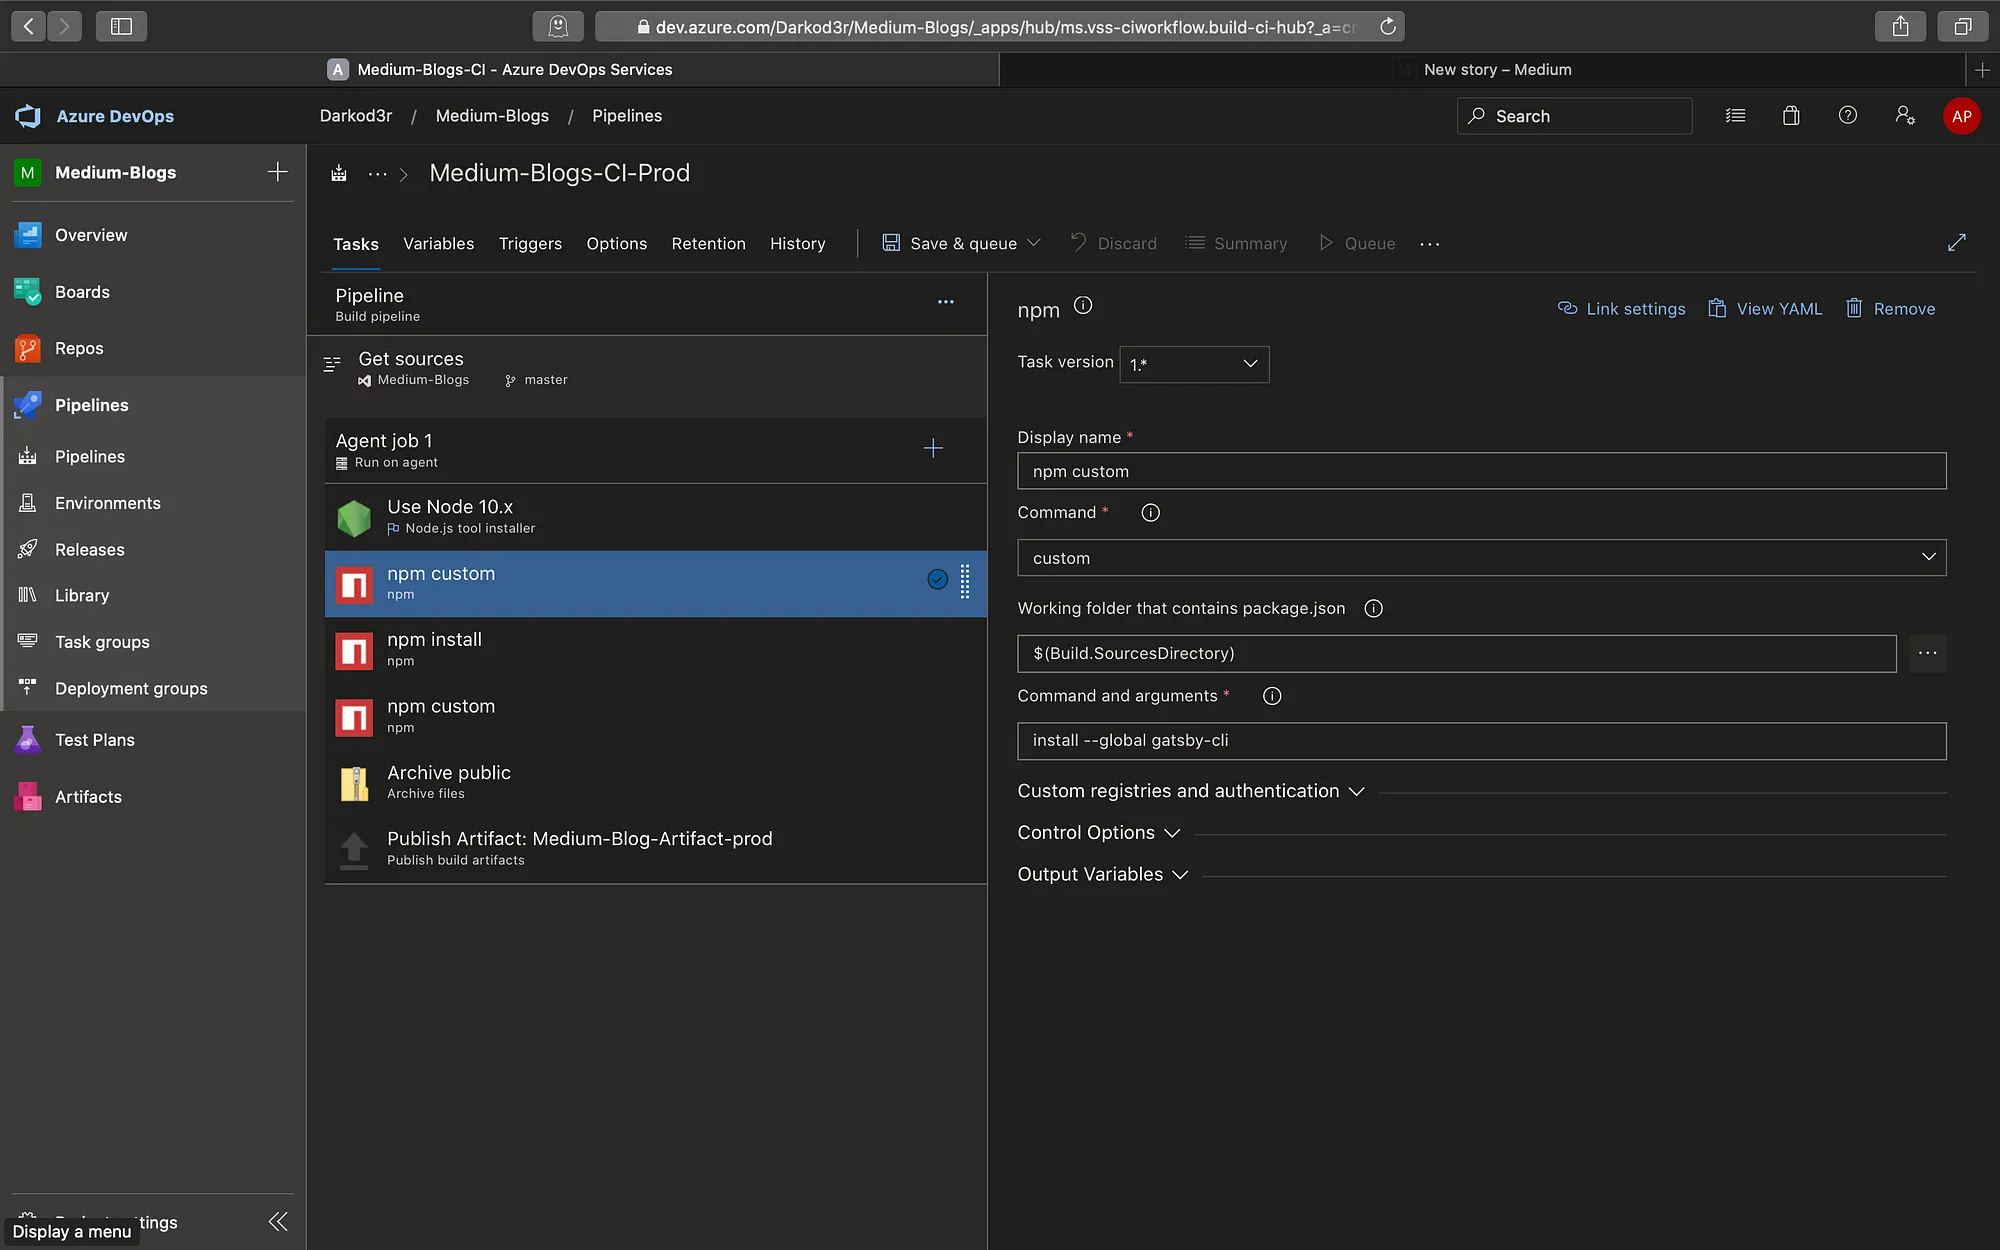
1. NPM task- Install and publish npm packages, or run an npm command. Supports npmjs.com and authenticated registries like Azure Artifacts.
2. Commands available: CI, Install, Publish, Custom.
3. For custom commands, no need to prepend npm.
4. IRoot directory that contains the package folder: ${Build.SourcesDirectory}- It is a predefined variable. The local path on the agent where your source code files are downloaded. For example: c:\agent\_work\1\s. These variables are automatically set by the system and read-only.
5. More info on predefined variables: Go to Predefined Variables.
6. There can be multiple versions of a task. Make sure to use the stable version and avoid using preview versions.
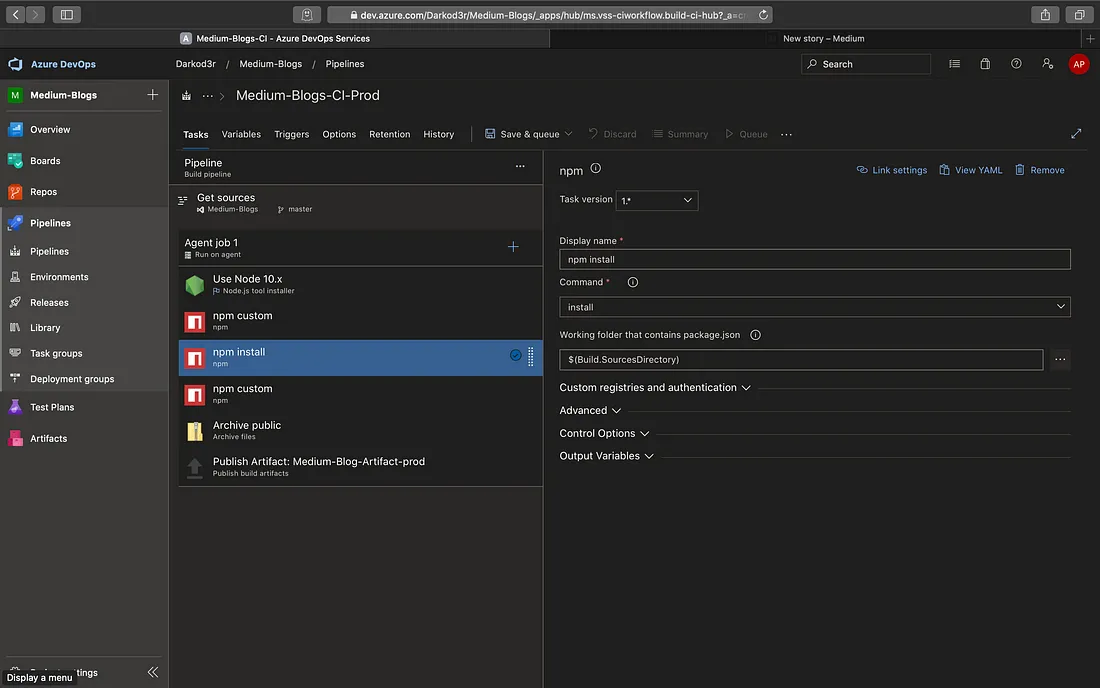
1. The npm install command will install the devDependencies along with other dependencies when running inside a package directory, in a development environment (the default).
2. Every time a new build is triggered, there will be a fresh instance of the Agent which will not hold any npm-cache.
3. Avoid installing devDependencies in a production environment. Use Custom command → install — only=prod
4. We can add npm tasks for unit testing, linting, etc. If tests are succeeded then the only pipeline will get succeeded.
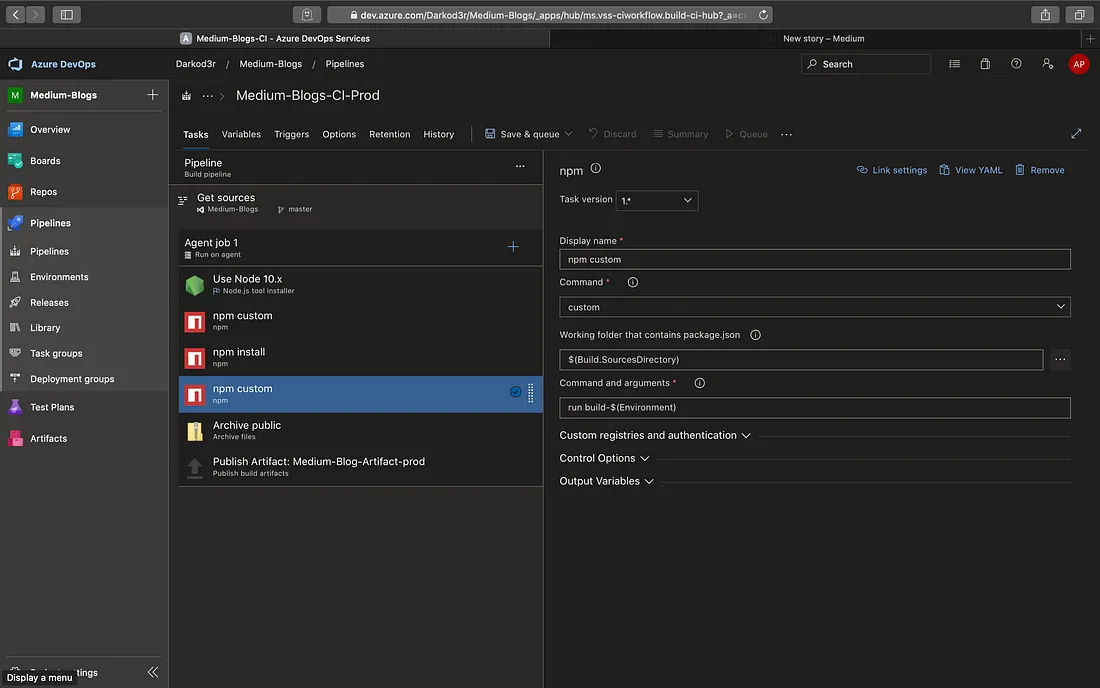
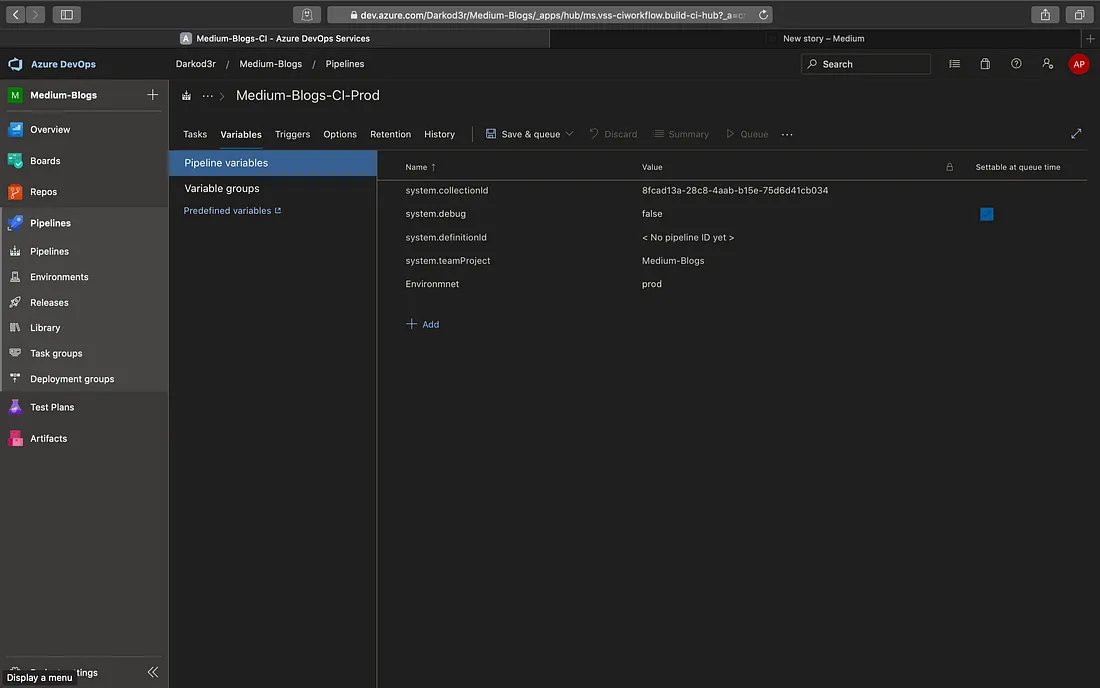
Use Environment variables to parameterize the commands. Use run build-$(variable-name) →Go to Variables tab → Add Variable → variable-name → value
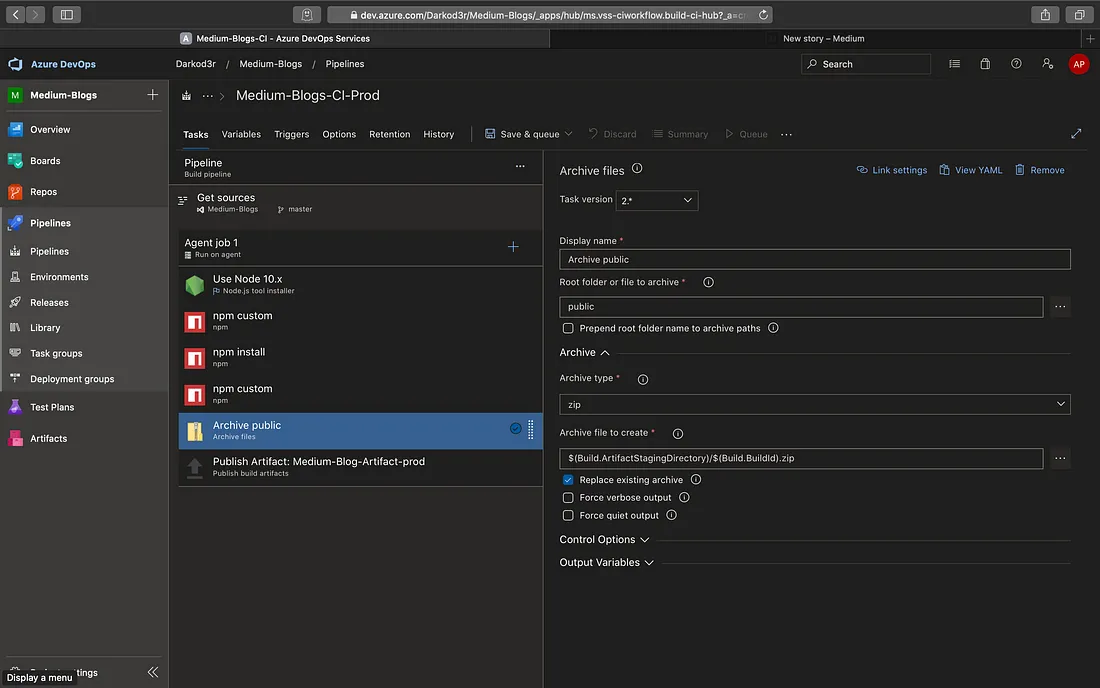
1. Archive Files: Compress files into .7z, .tar.gz, or .zip.
2. We will do zip deployment to reduce the deployment time. We can also use Copy task to create artifact but since there will be a large number of files, it will be slower compared to a zip deploy.
3. Specify the folder/directory you want to archive. eg. public/out.
4. Specify the Archive filename to will be created.
5. Prepend the root folder name →this checkbox will create a folder with an archive name and put all the files inside that folder before archiving.
6. Replace the existing archive- this checkbox will delete the previous archive before creating a new archive on every new build.
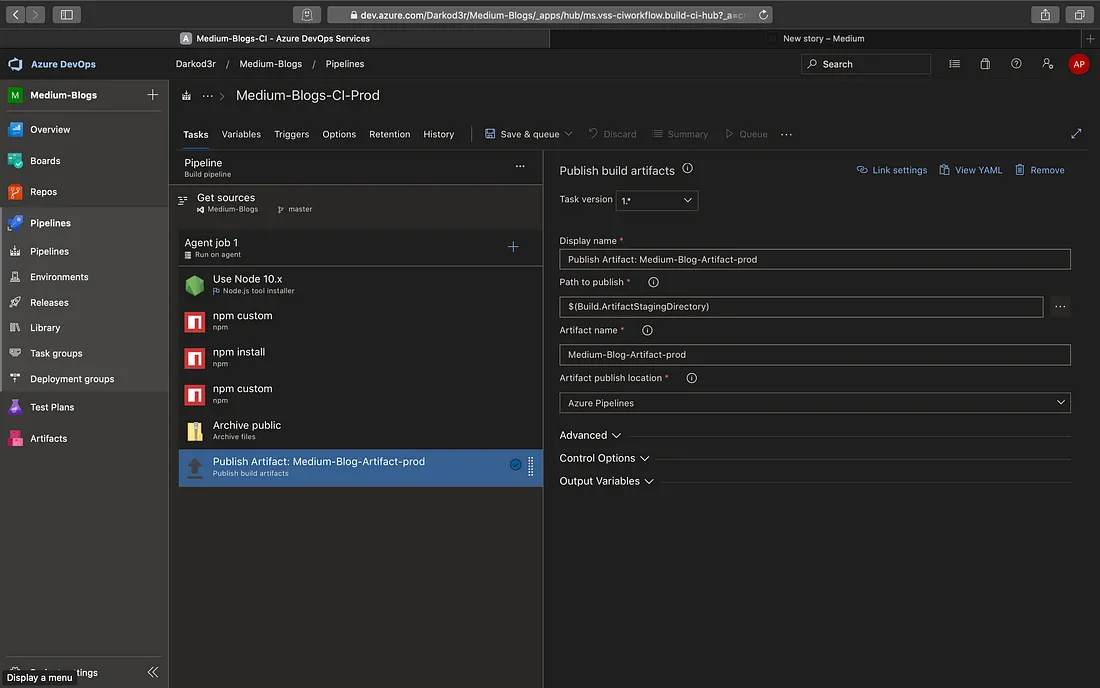
Publish build artifacts: Publish build artifacts to Azure Pipelines or a Windows file share.
Keep Default settings.
You can give a custom artifact name.
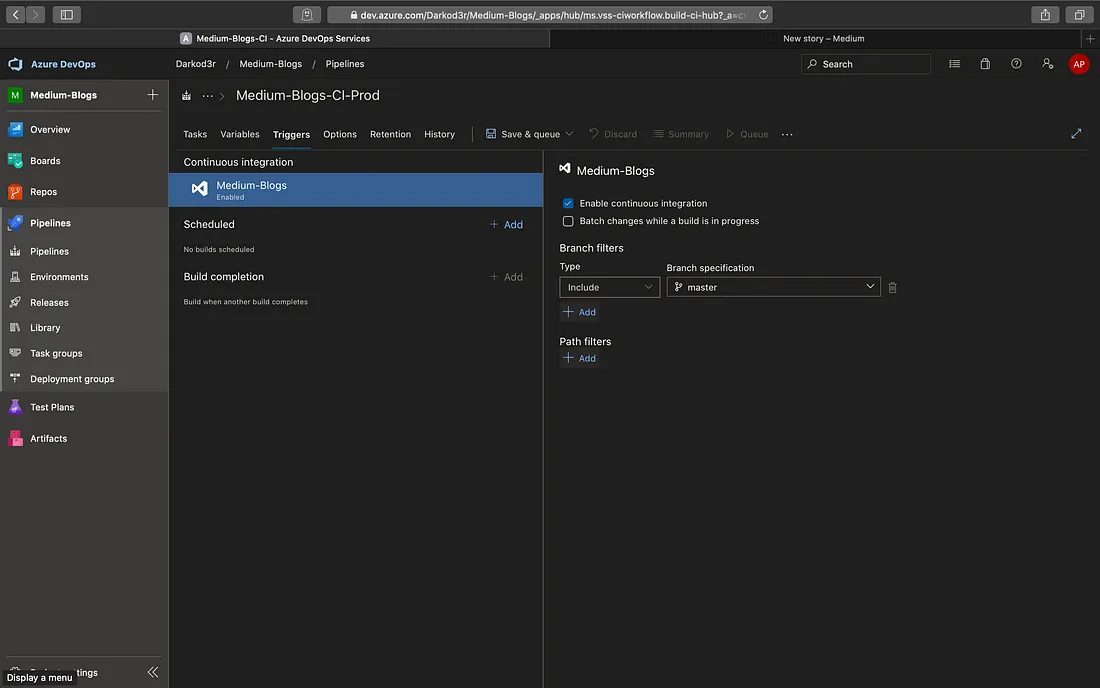
Enable Continuous Integration to trigger the Build pipeline whenever any change is made in the filter-branch.
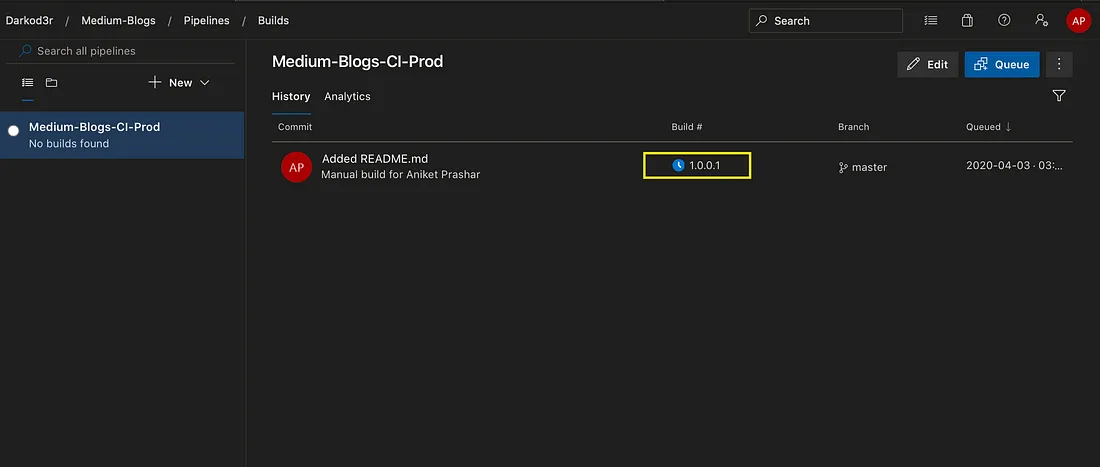
Build number format will create build number as Major.Minor.Patch.UniqueID → 1.0.0.1 (Semantic Versioning)
Semantic Versioning of buildId will make more sense 🤔 than just having a unique number as buildId.
Build.BuildId is a predefined variable that increments every time a new build is given scoped to the organization level (1,2,3….n).
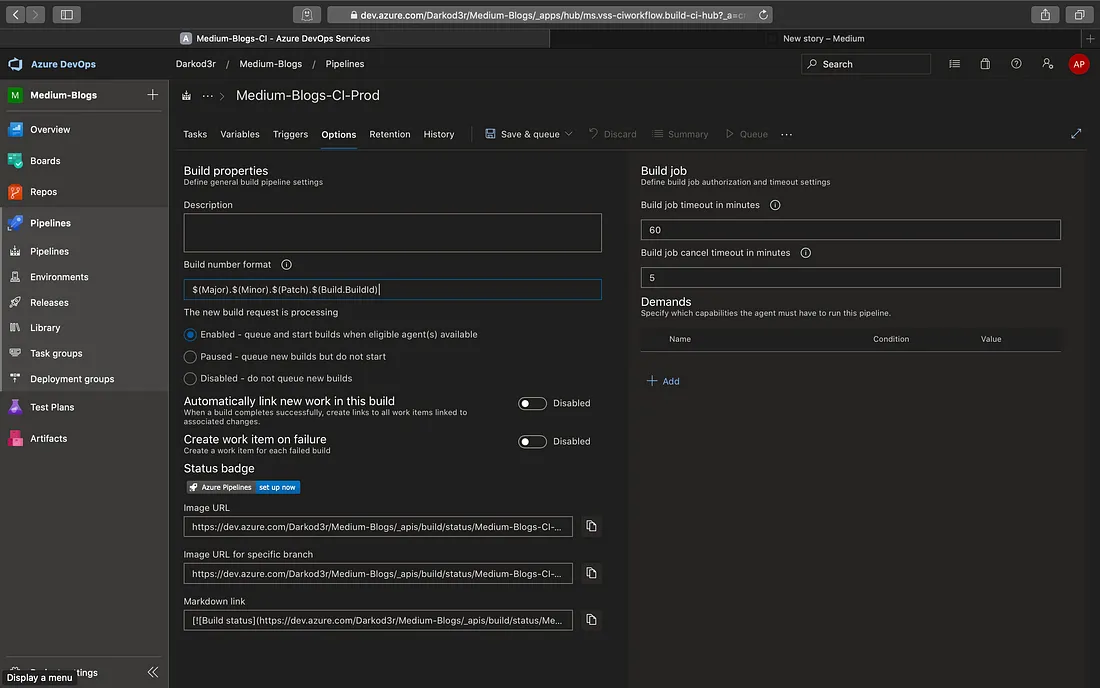
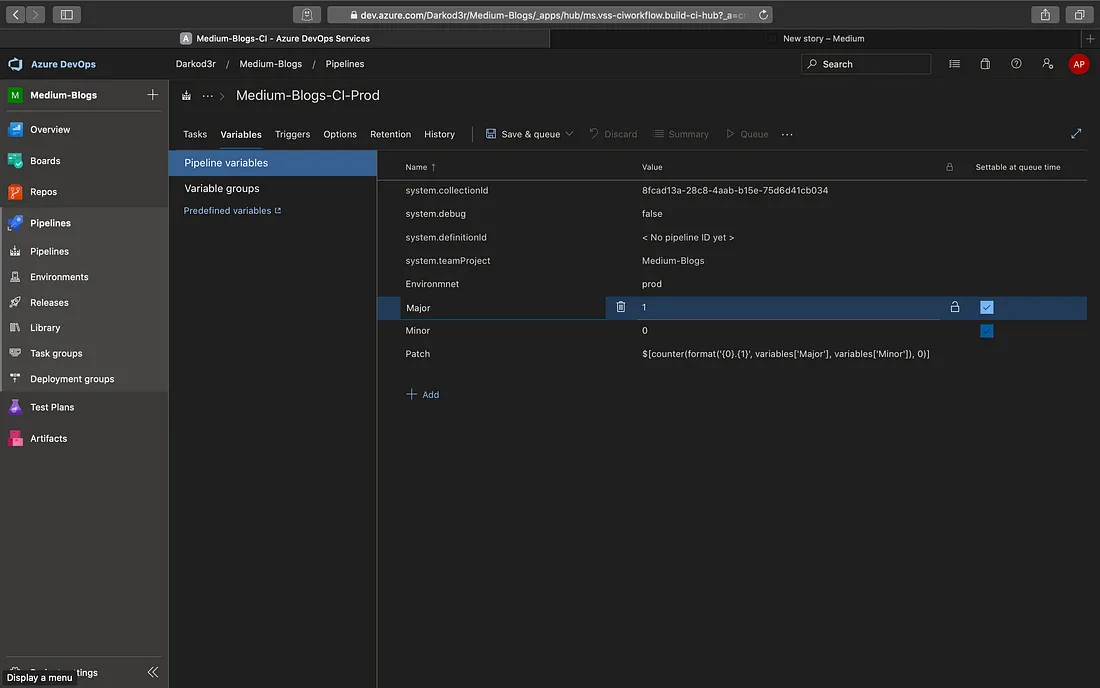
Add the variables Major, Minor, and Patch in the variables tab.
Major- 1, Minor- 0, Patch- $[counter(format(‘{0}.{1}’, variables[‘Major’], variables[‘Minor’]), 0)]
The Patch variable will start from 0 and increment every time a new build is triggered. It will reset to 0 when Major or Minor value is changed/incremented.
Keep these two variables as settable at runtime so that the application team can change the major/minor versions during runtime.
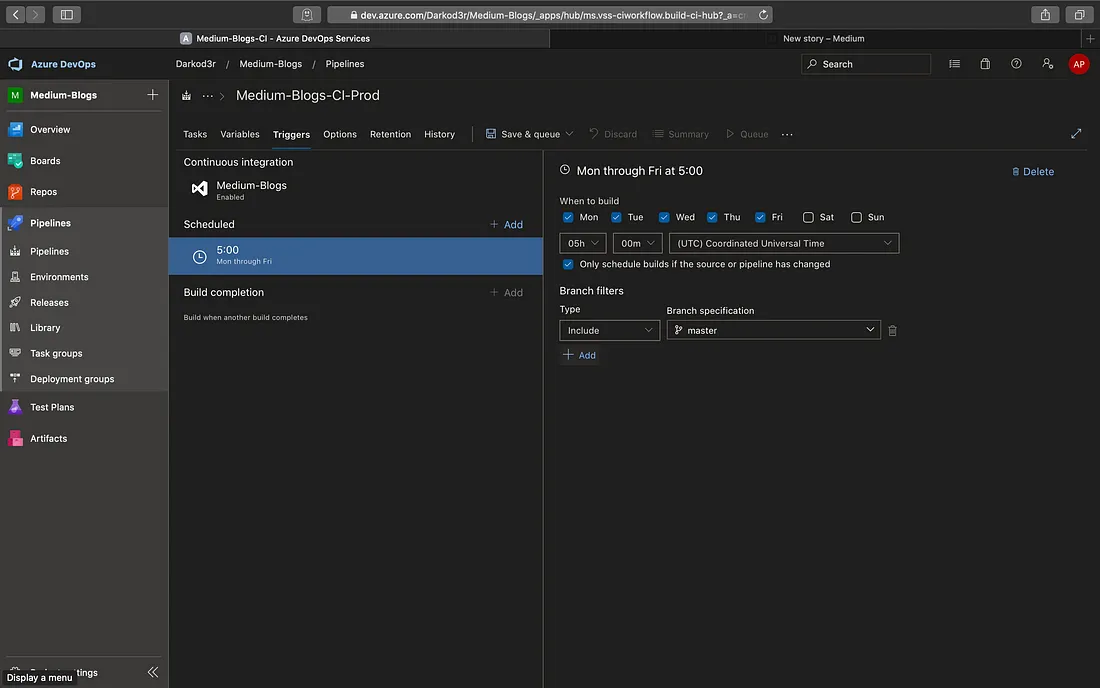
We can also schedule the build time
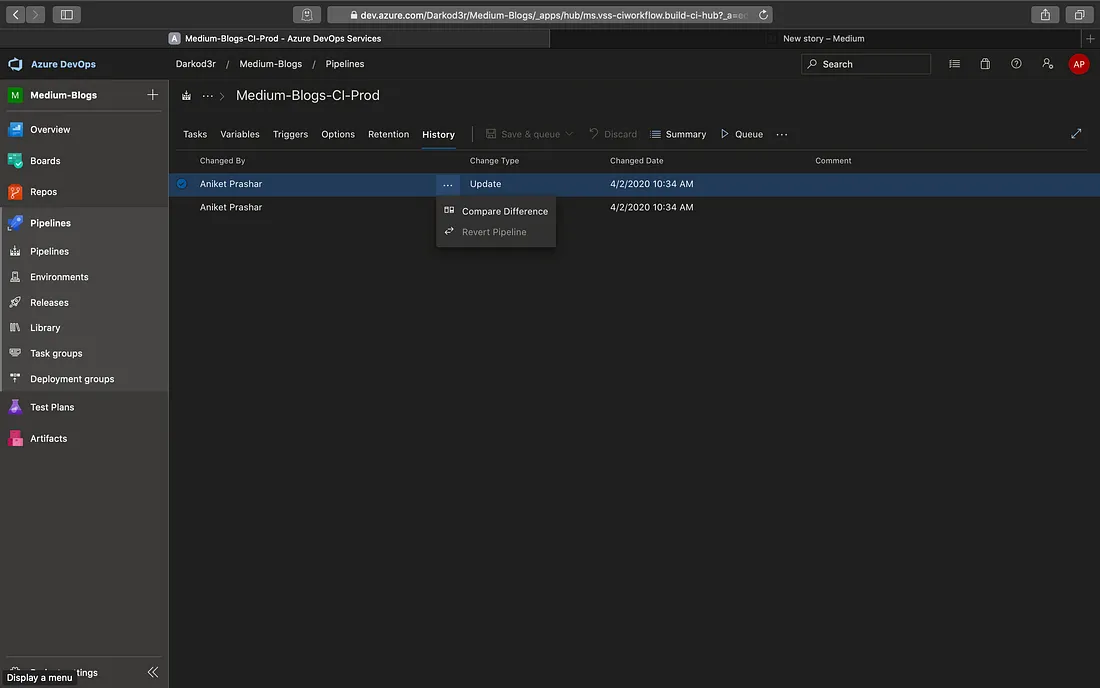
History Tab: To view the history of changes made to the build pipeline and compare the differences.
Pipelines can also be reverted back to its earlier state using the Revert Pipeline option.
What if you have to create lots of pipelines in your project that will use the same set of tasks
Task groups: If there are similar tasks in different pipelines, either in the same project or in different projects, you can create task groups from the existing pipeline tasks as shown in the figure. Select all the tasks and right-click → select Create task group.
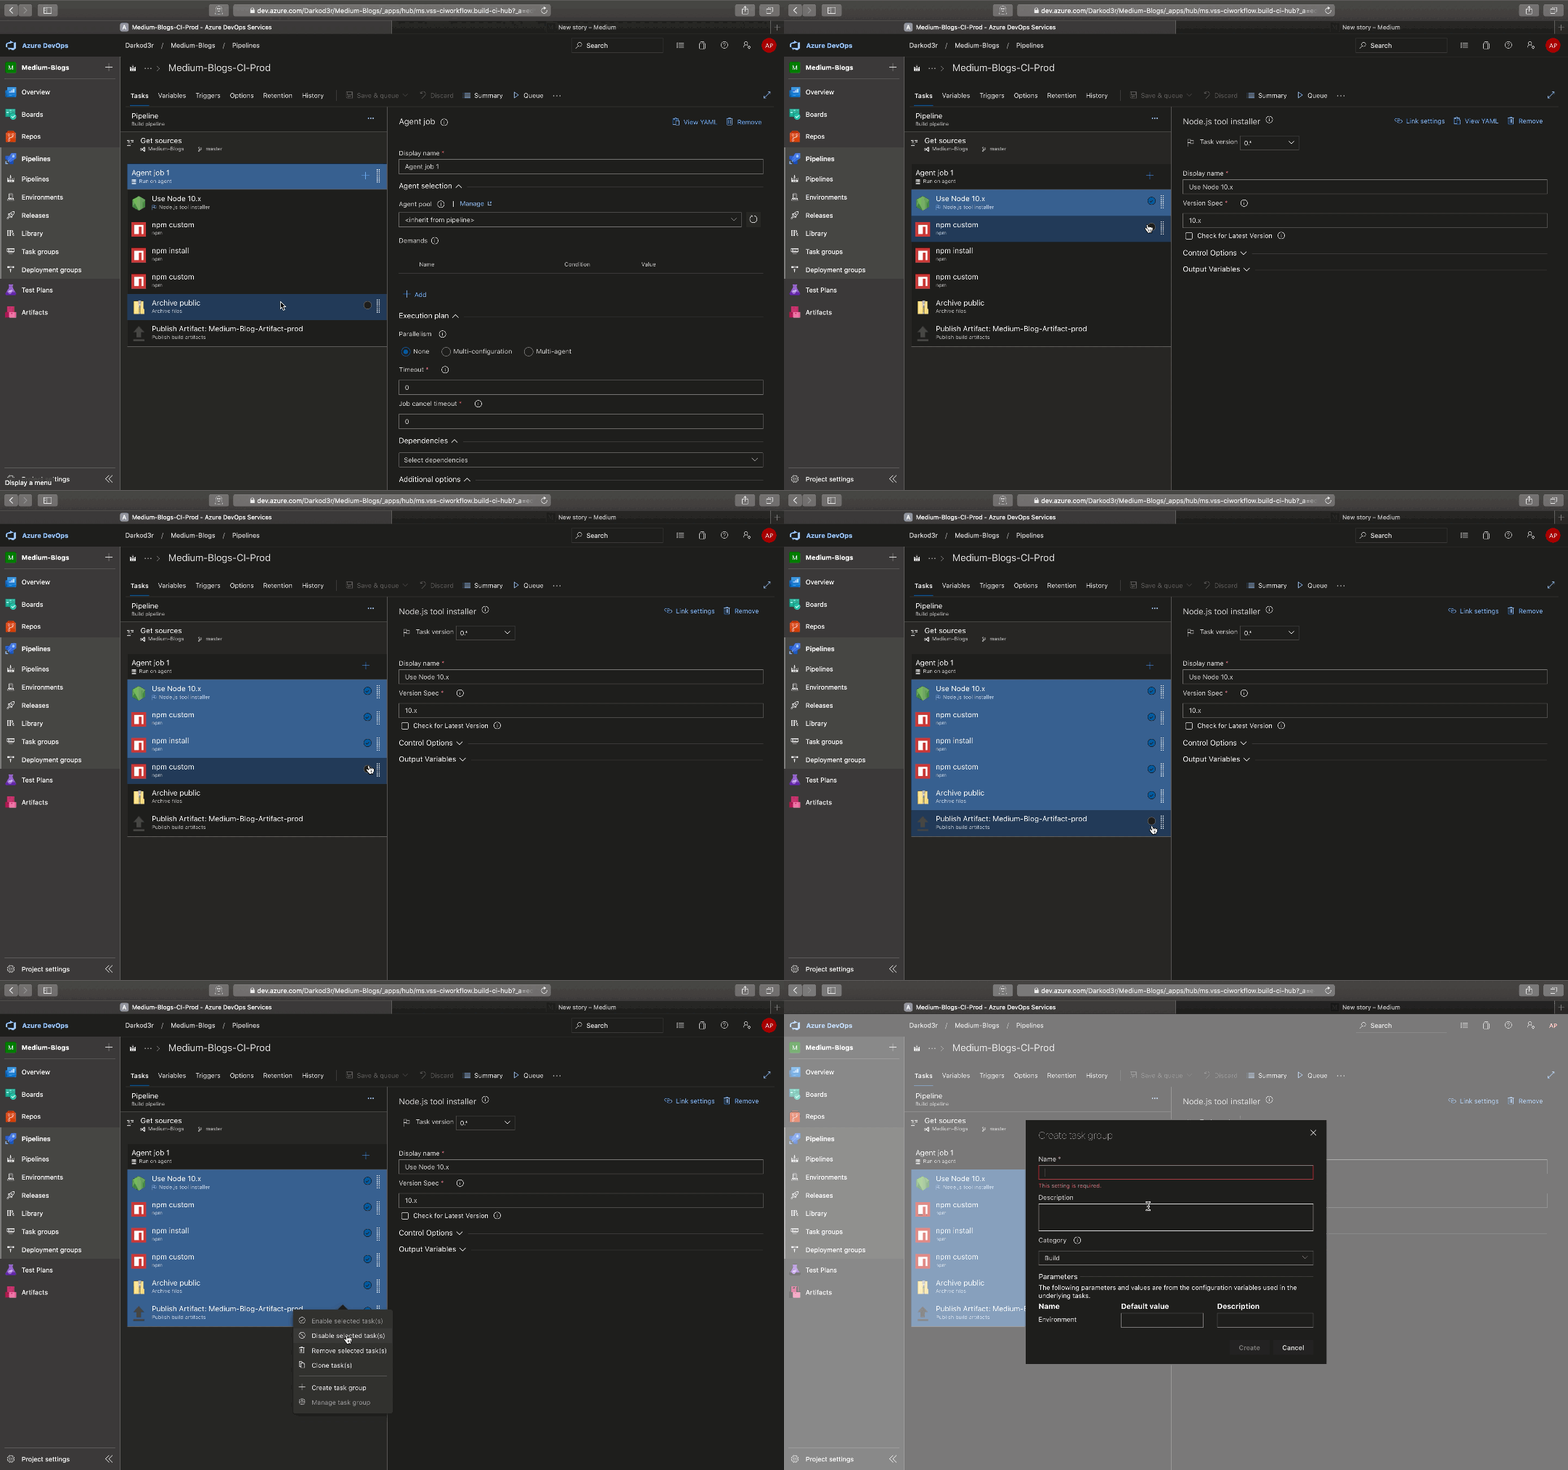
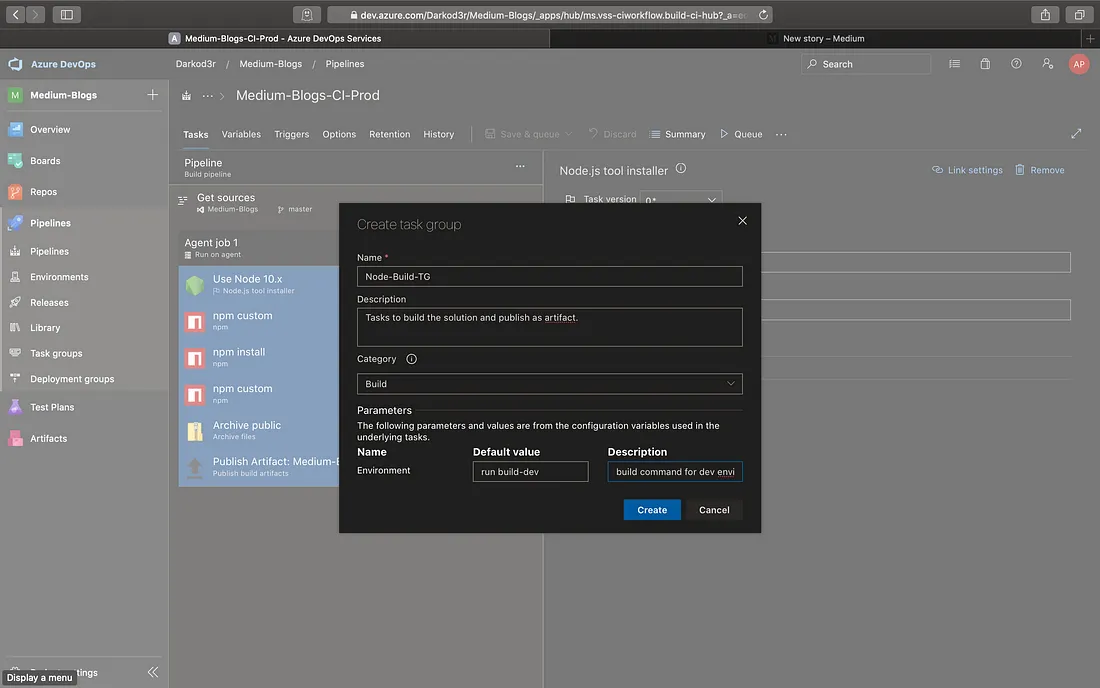
If the arguments are different in the tasks then you can write it as variable $(variable-name) and it will ask for the value when you add it as a task group as shown in the image below.
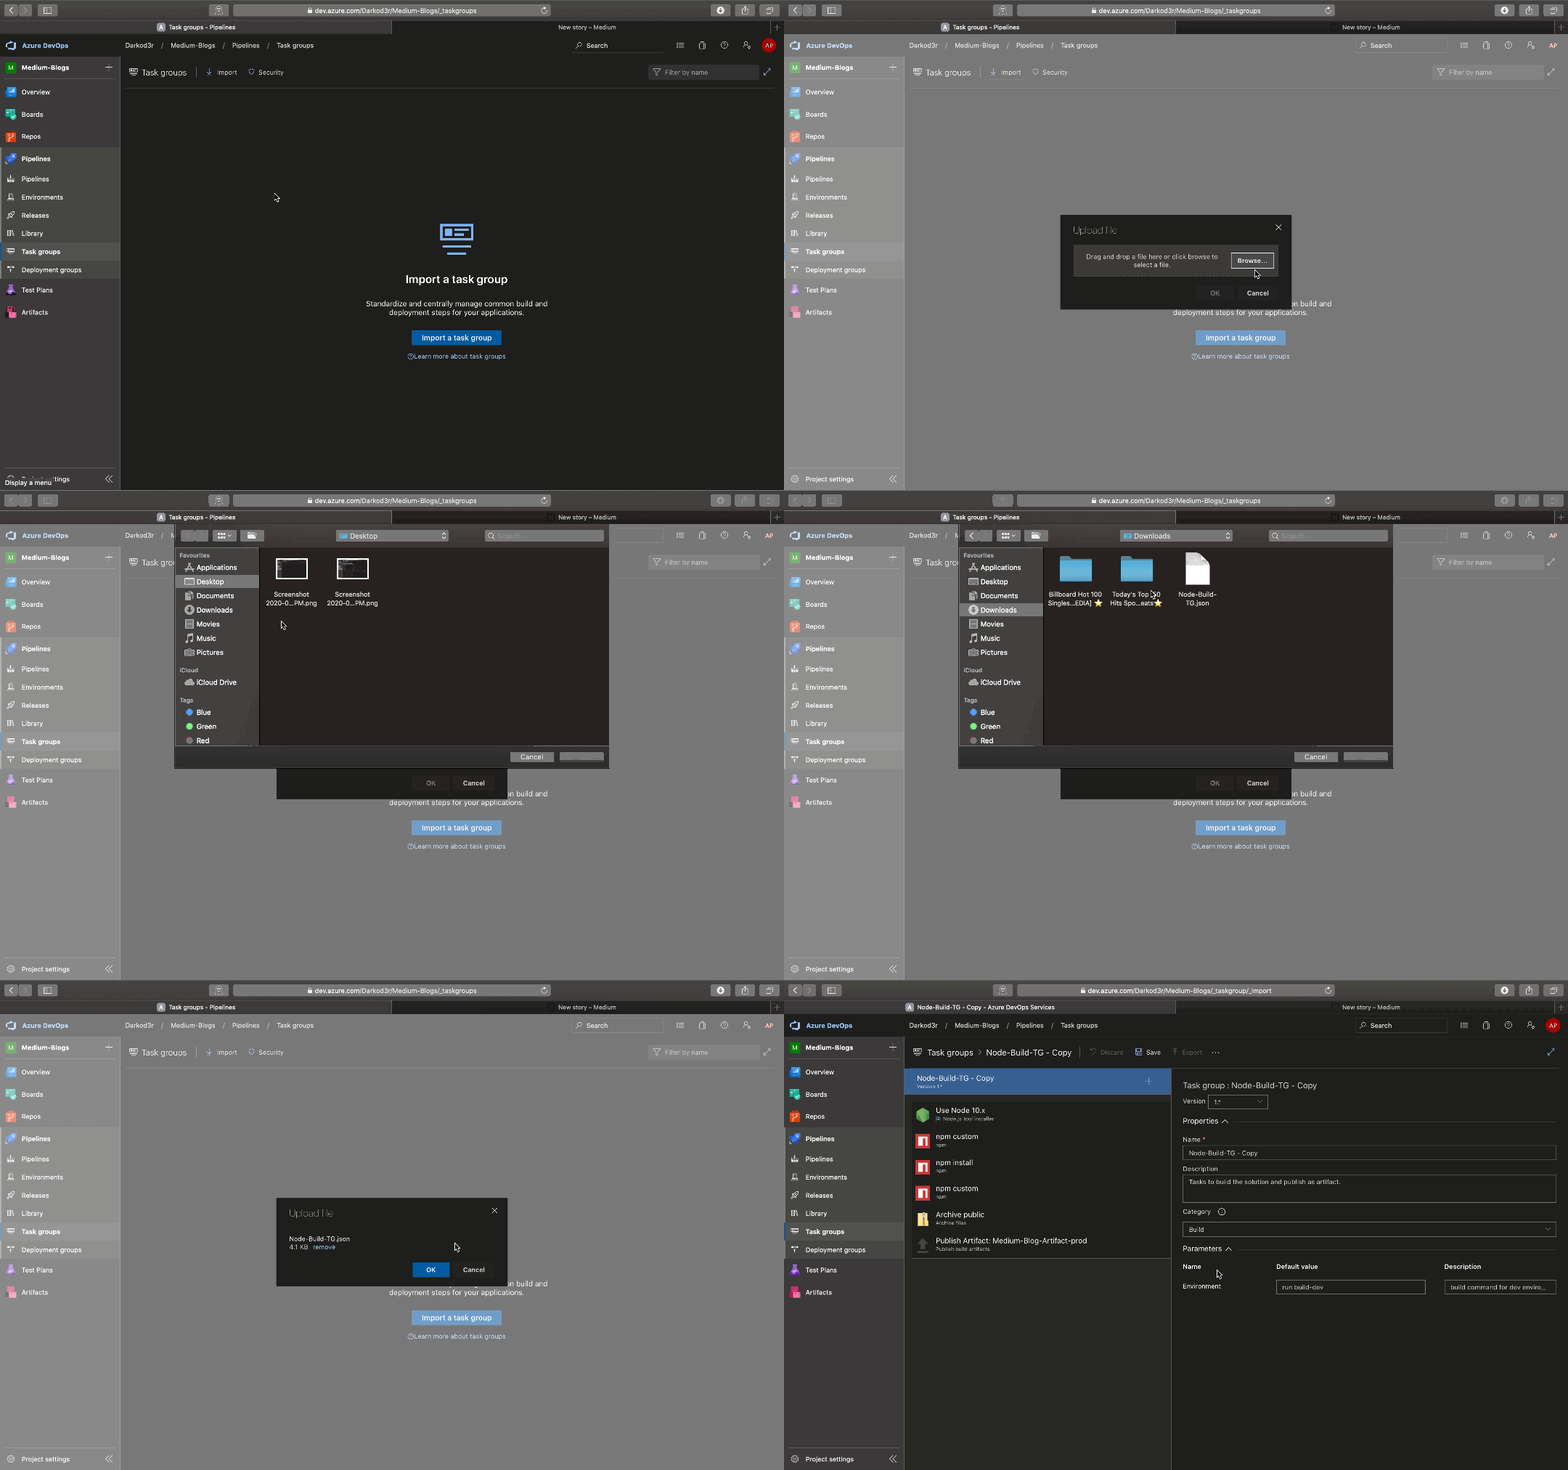
We can export and import the task groups to use it in multiple Azure DevOps projects.
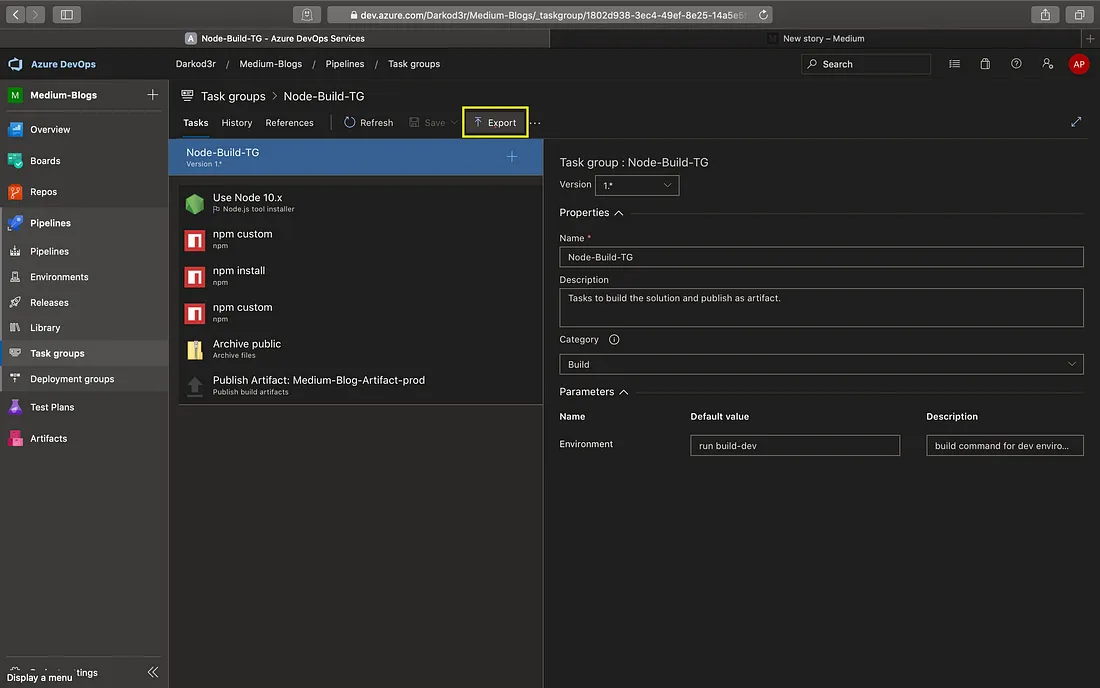
- 1.19 Export Task Group
Create a Release Pipeline
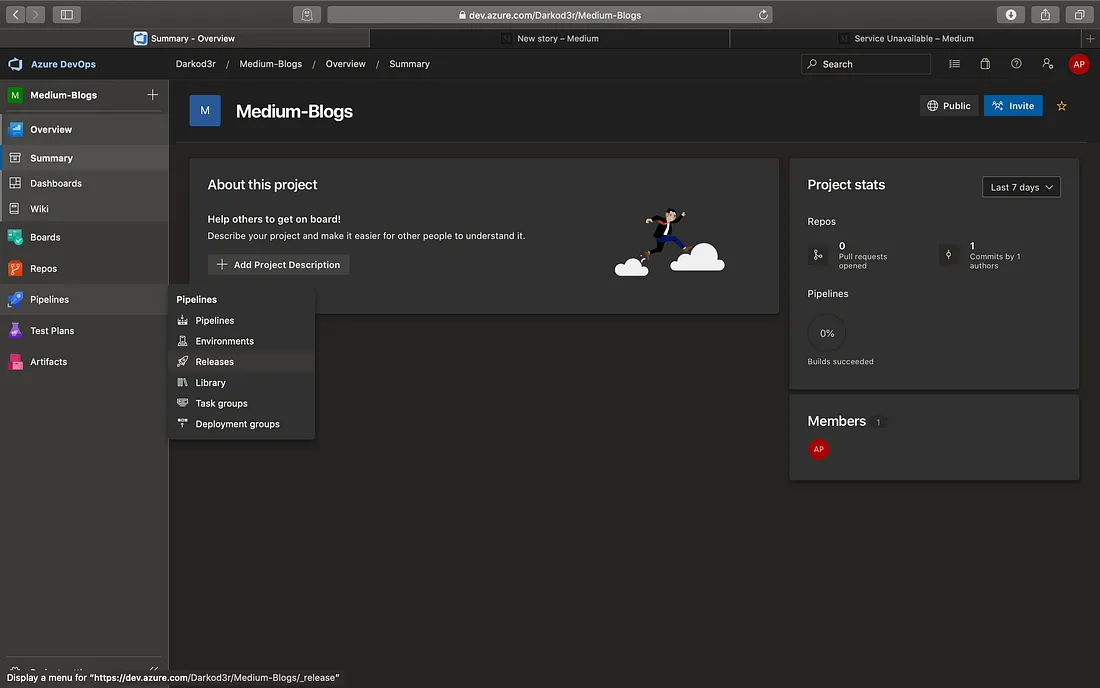
Goto dev.azure.com/{organisation-name} → Select Project →Pipelines → Releases.
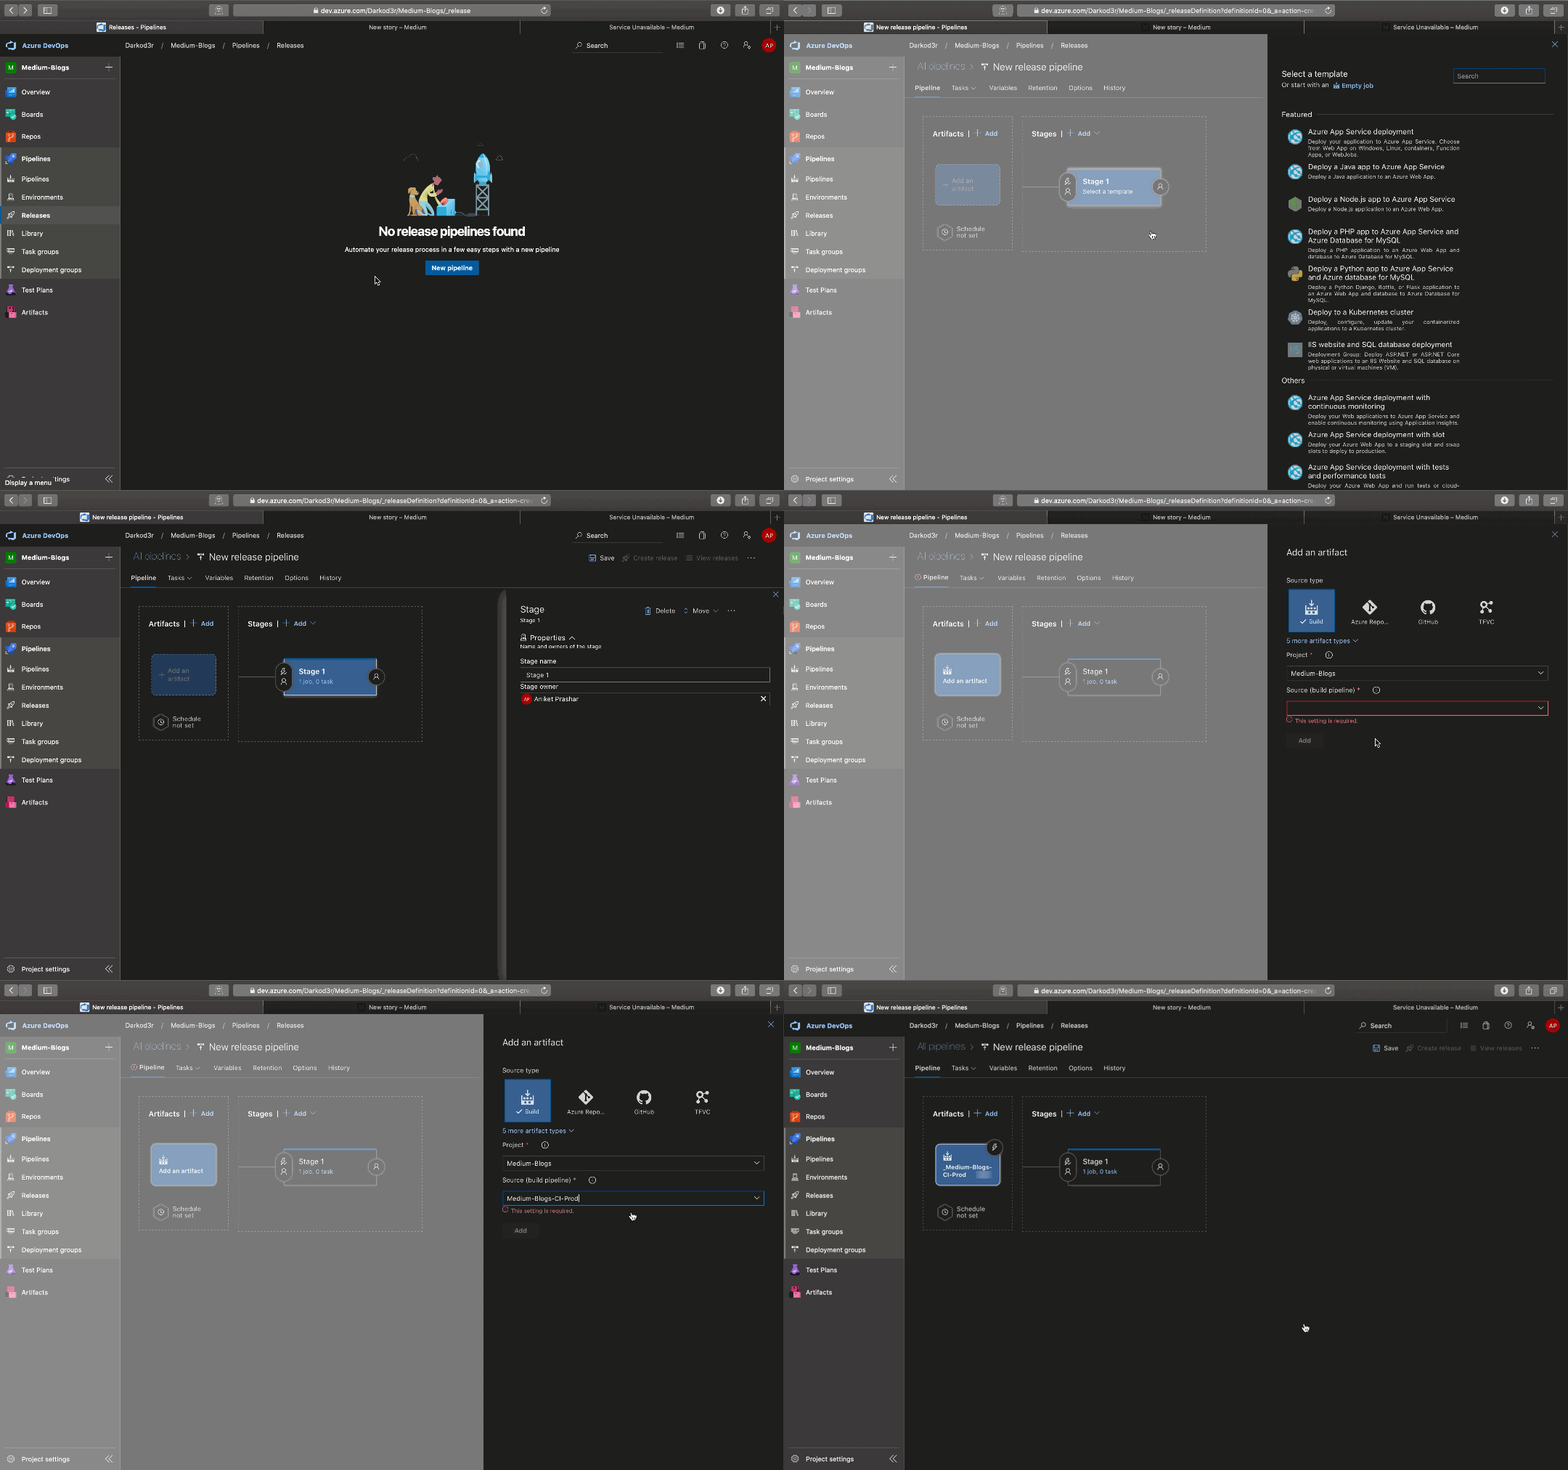
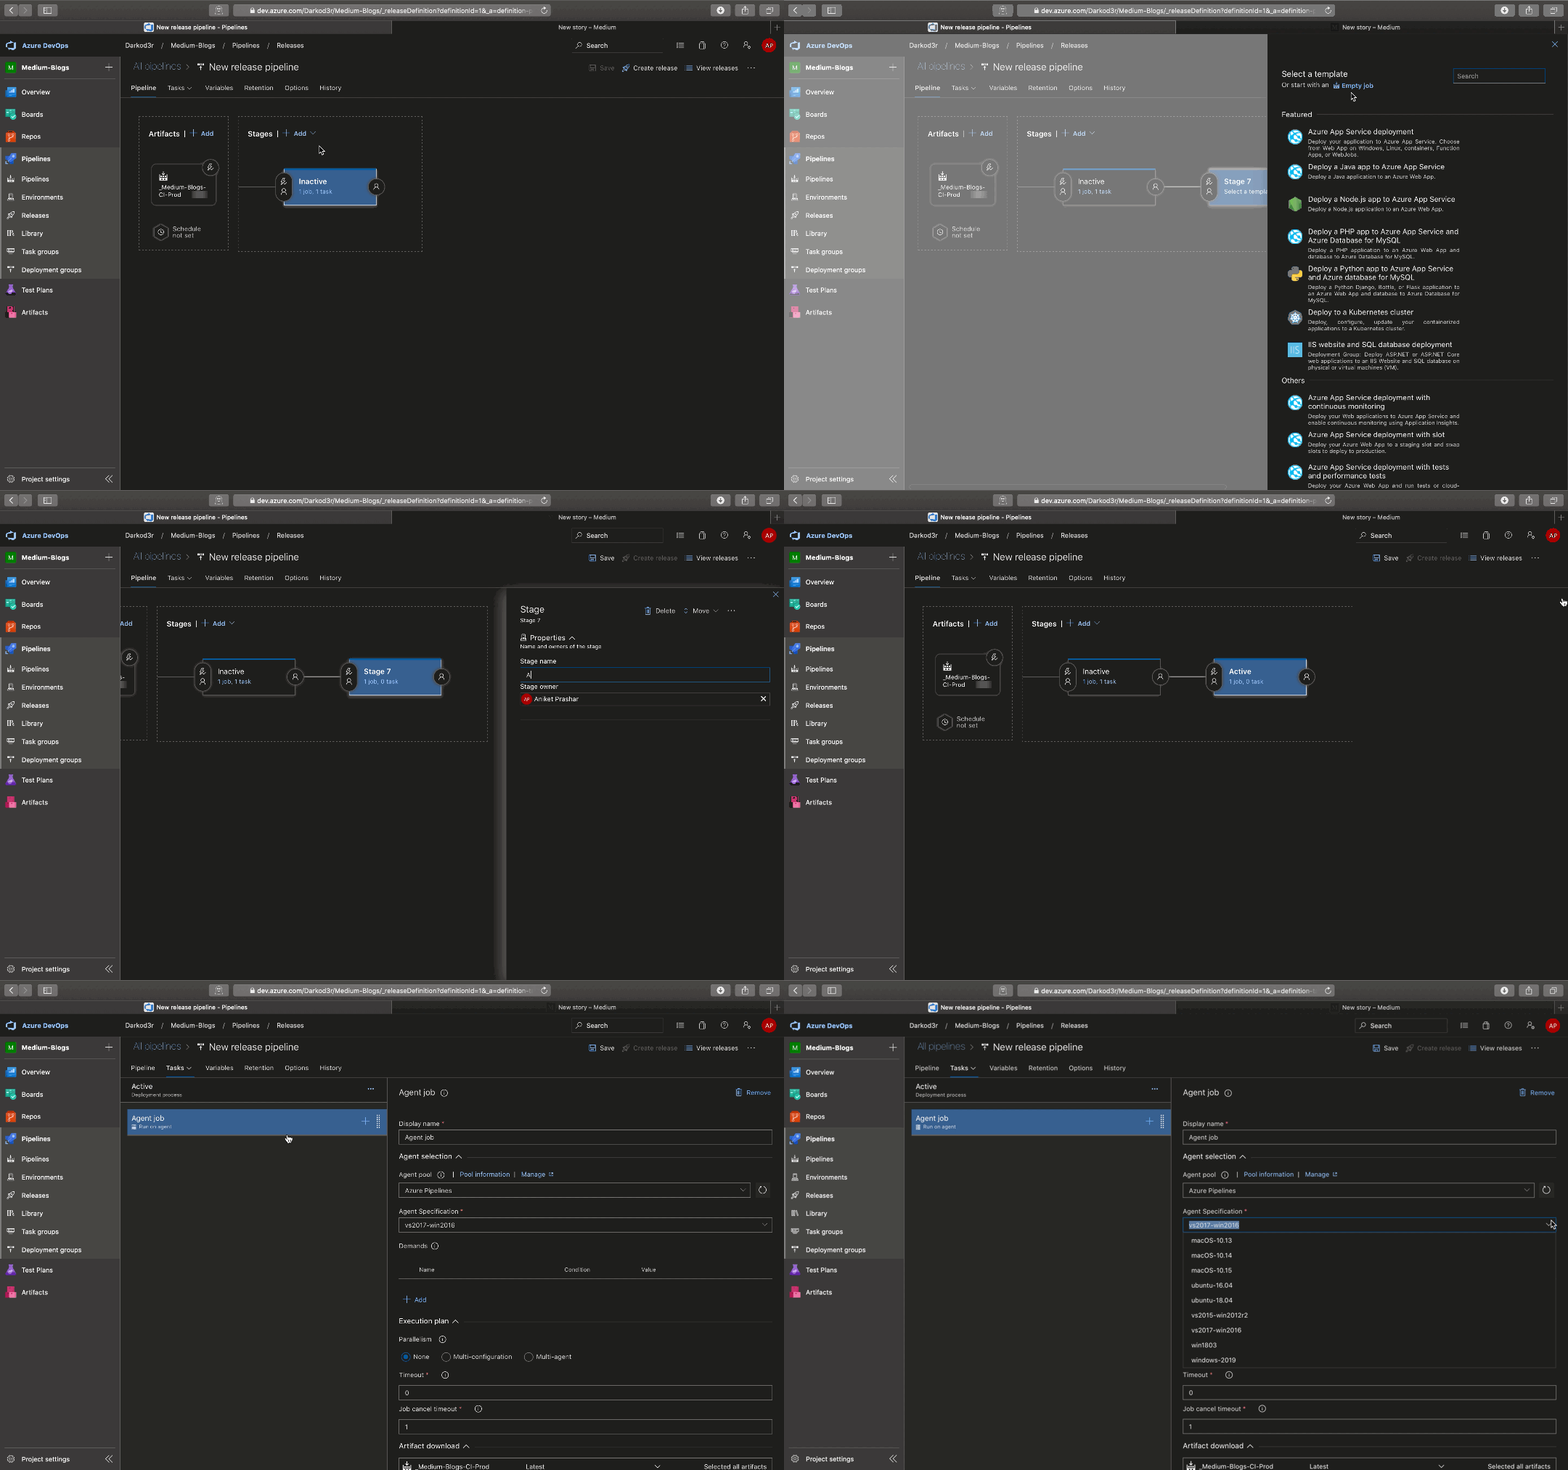
New pipeline → Select Empty Job
Rename Stage
Click on Add an Artifact → select source build pipeline → Default Version: Latest → Alias of the Artifact: Default → Add
Source alias: It will create a folder in the Agent with the same name source alias (_Medium-Blogs-CI-Prod in our case). Artifacts will be stored in this folder in the agent.
Enable continuous deployment. Whenever a new build associated with this pipeline is available, a new release will get triggered.
Enable Branch Filter to trigger release from selected branches only.
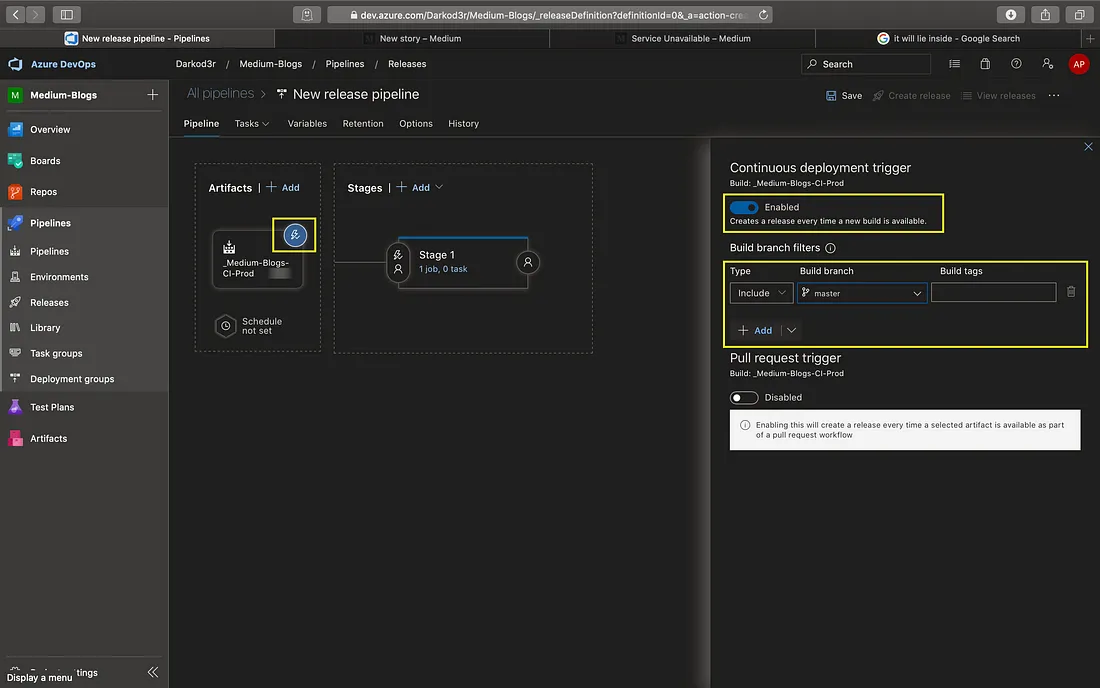
- 2.3 Continuous deployment trigger
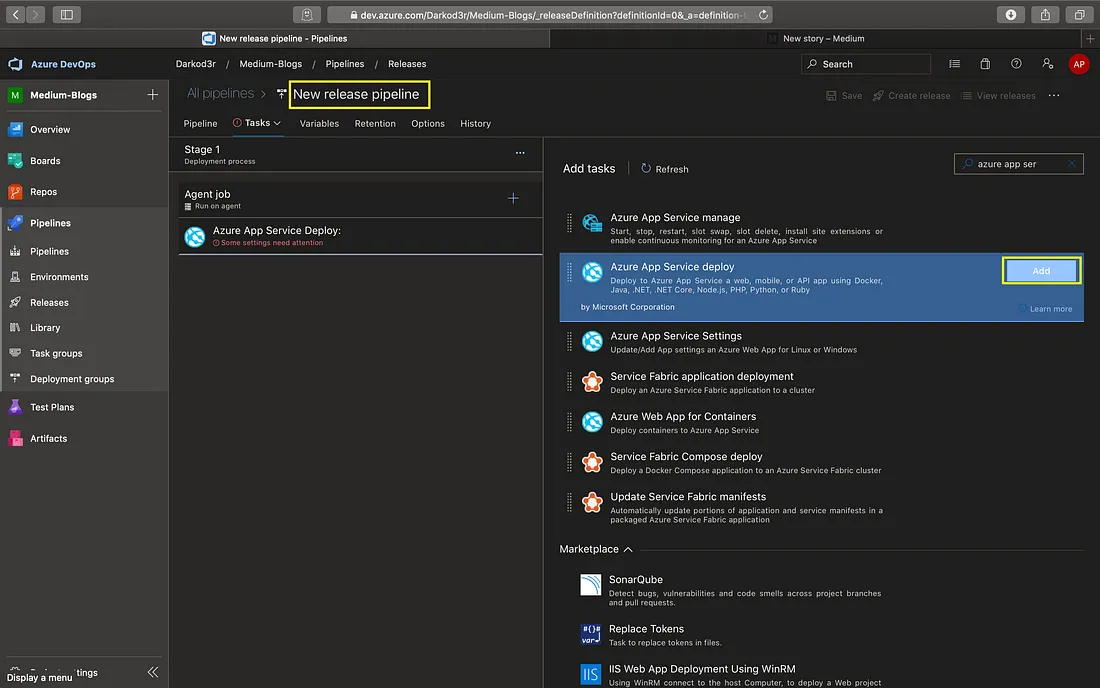
Edit Name of pipeline → Add task: Azure App Service Deploy
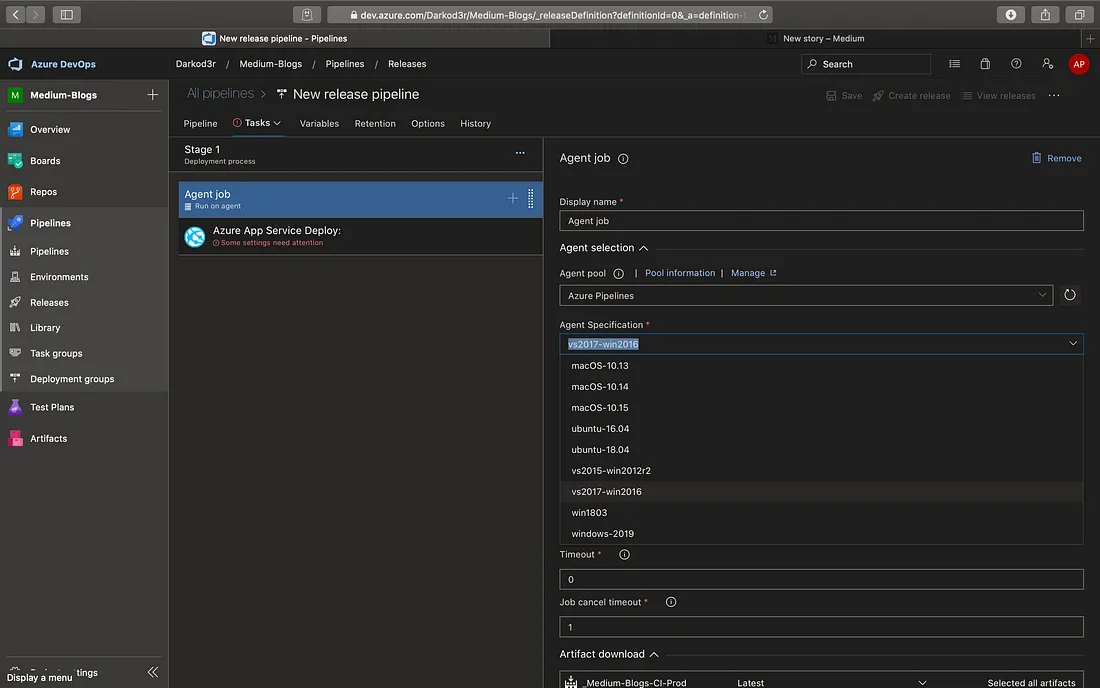
Go to Agent job → Select Agent Pool as per requirement { Hosted vs2017-win2016 for Windows Environment & Hosted Ubuntu 18.04 for Linux based environment }.
Prefer to use Microsoft Hosted Agents instead of Self Hosted Agents unless you know what you are doing 😕
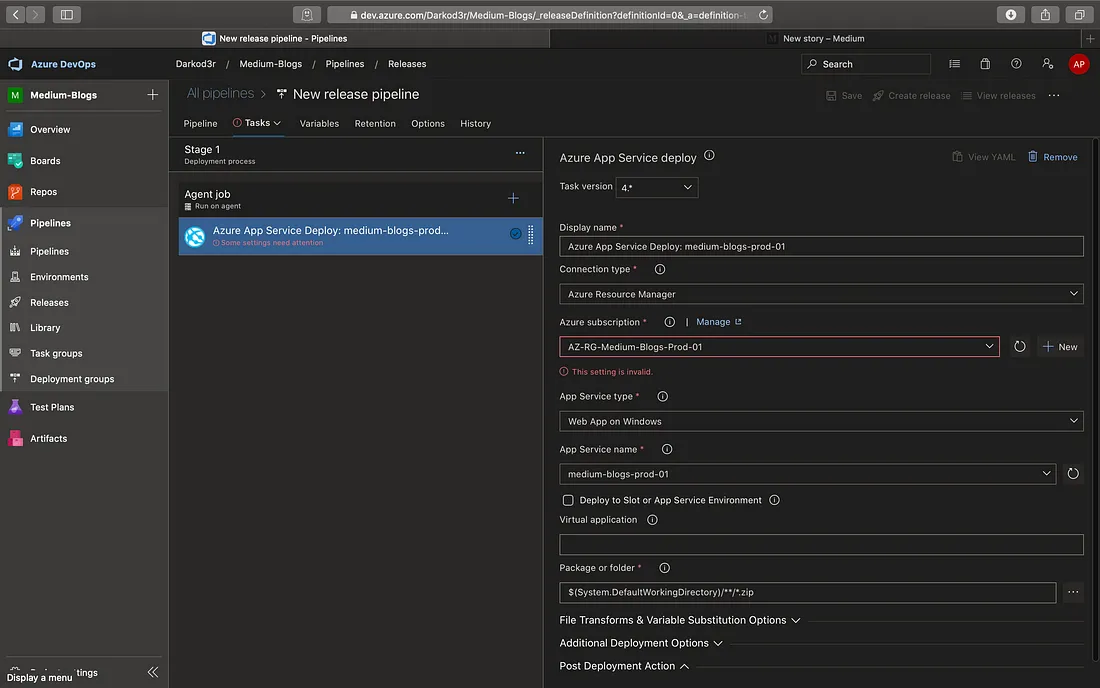
Select App service type as Web App on Windows(task version 4) / Web App(task Version 3) for the windows-based machine.
Deploy to Slot will be checked for production pipelines only
Package or folder: $(System.DefaultWorkingDirectory)/**/*.zip → This option will find any zip file in the default working directory. Example location:- Linked Artifacts → Artifact Alias → Artifact-Name → ${BuildId}.zip
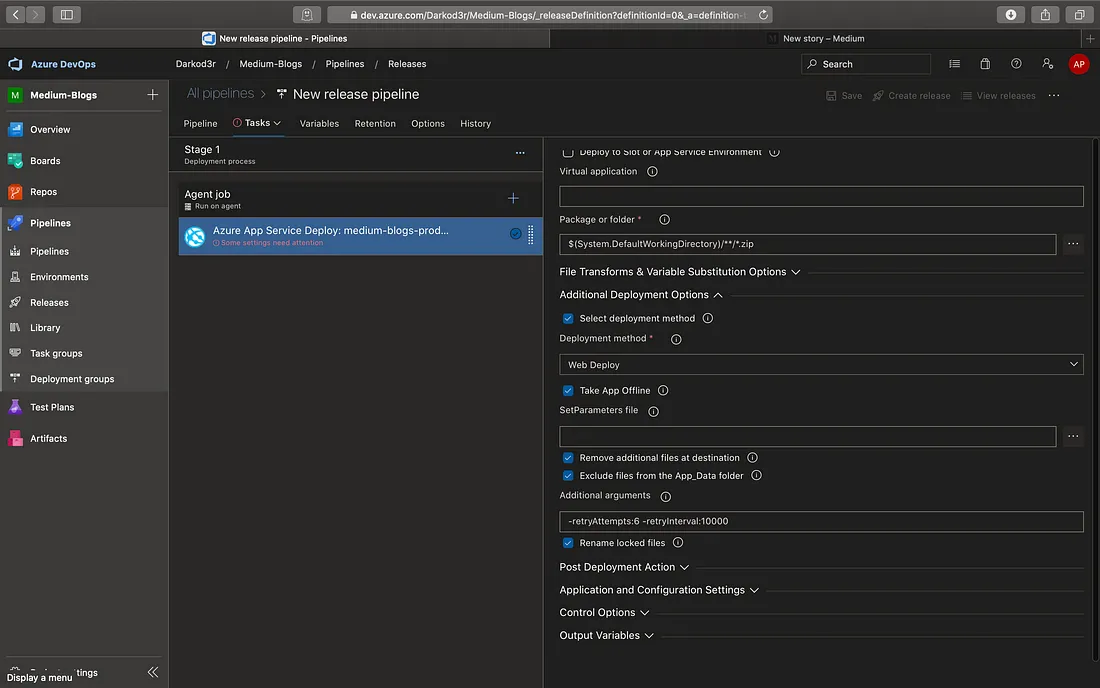
1. Additional Deployment Options: If unchecked, it will auto-detect the best deployment method based on your app type, package format, and other parameters. Select the option to view the supported deployment methods and choose one for deploying your app.
2. Take App Offline: Select the option to take the Azure App Service offline by placing an app_offline.htm file in the root directory of the App Service before the sync operation begins. The file will be removed after the sync operation completes successfully.
3. Remove additional files at destination: Select the option to delete files on the Azure App Service that have no matching files in the App Service package or folder. Note: This will also remove all files related to any extension installed on this Azure App Service. To prevent this, select ‘Exclude files from App_Data folder’ checkbox.
4. Excludes files from the App_Data folder: Select the option to prevent files in the App_Data folder from being deployed to/ deleted from the Azure App Service.
What if the web application is not static 🤔
we will have to start a node server on the Azure App Service which can serve the requests.
To start a node server in the windows app service we will have to include a web.config file at the root of the directory.
To create web.config file during release go to File Transforms & Variable Substitution Options →Check Generate Web.Config checkbox and provide the parameters of web.config file like name of server file, app type, etc. It will generate a web.config file that will start the node.exe server in the web app
The web.config file can vary depending upon the application. So, use a custom web.config file and keep it in the source code instead of generating it at runtime. When it generates the web.config file it tries to first unzip the artifact zip file in a temporary location (limited memory) then put the config file inside it and then zip it again. This takes a lot of time and if the zip file contains too many files then it may fail due to memory limitation. It uses a node package to zip and unzip the file. I have faced this issue with multiple applications that had a large number of files. A workaround will be to use copy task in the build pipeline instead of the archive task but it will slow down the pipeline.
Post Deployment Options: These scripts will run after the successful deployment of the package. You can give an inline script in the designer itself or can use a script file from the artifacts directory.
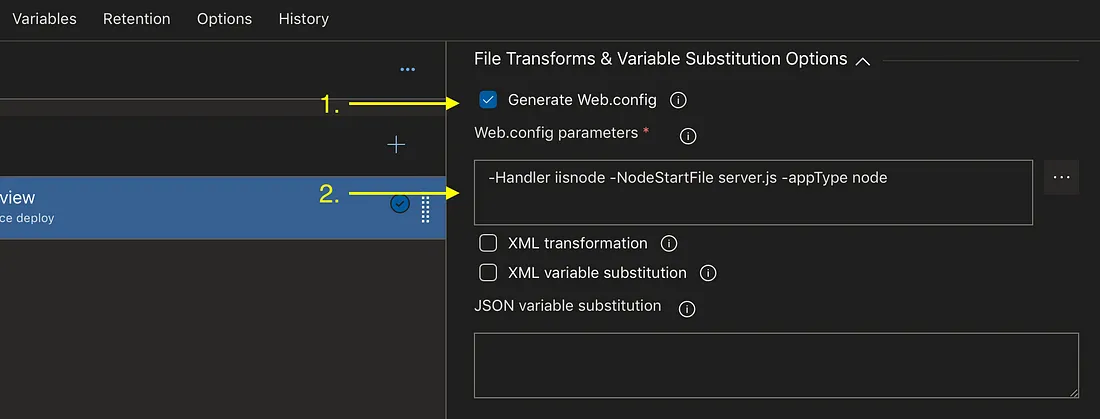
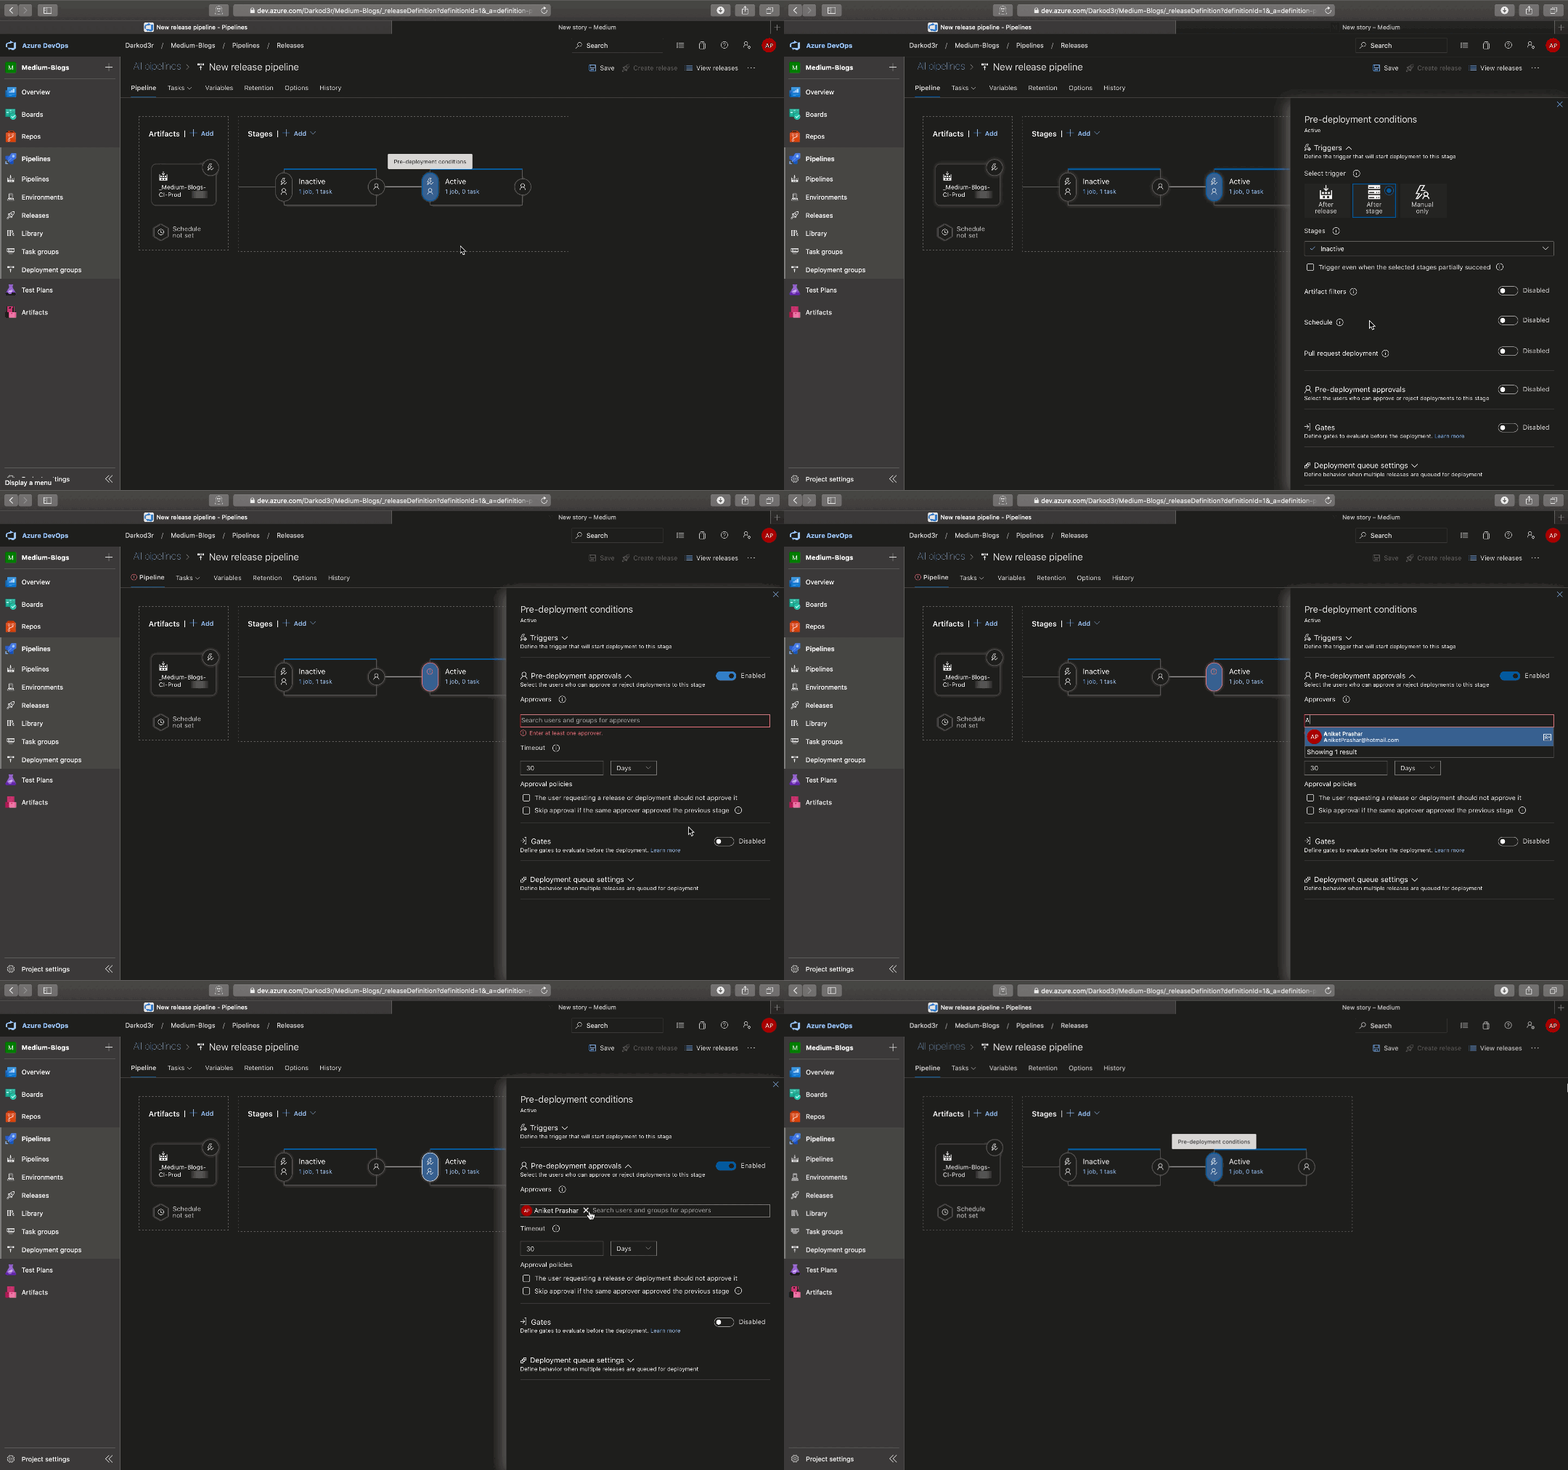
- Add a new Stage in the production pipeline for slot swapping.
- A new slot named Inactive/canary (depending on the deployment type) needs to be created in the app service first.
- In the First slot (Inactive slot) check the checkbox- Deploy to Slot or App Service Environment →Provide slot name (inactive/canary).
- It will deploy the package in the inactive/canary slot first before swapping it with an Active slot. This will ensure ~zero downtime in production deployment.
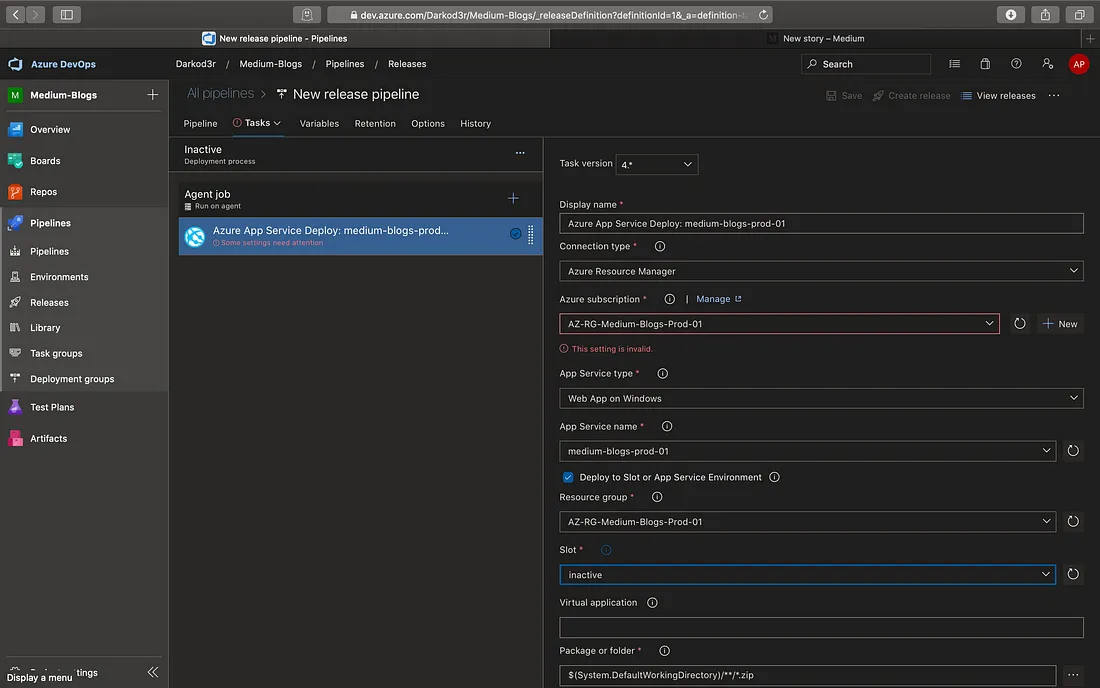
- Since a slot is also hosting an application, so it will also consume memory of ASP which may reduce the performance of production application.
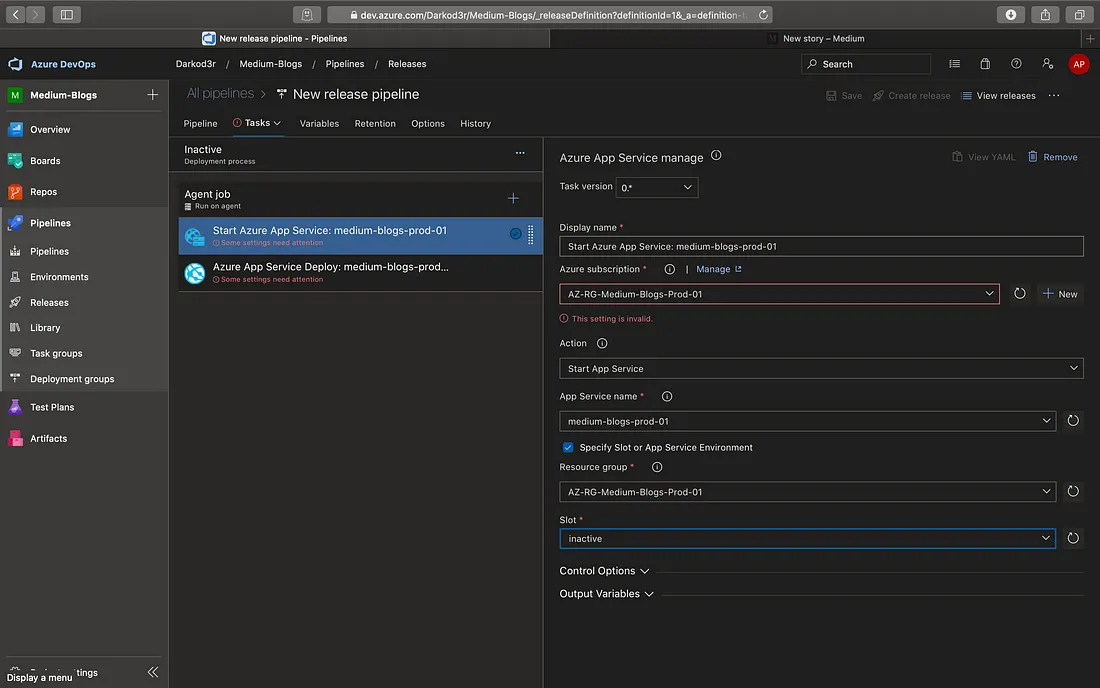
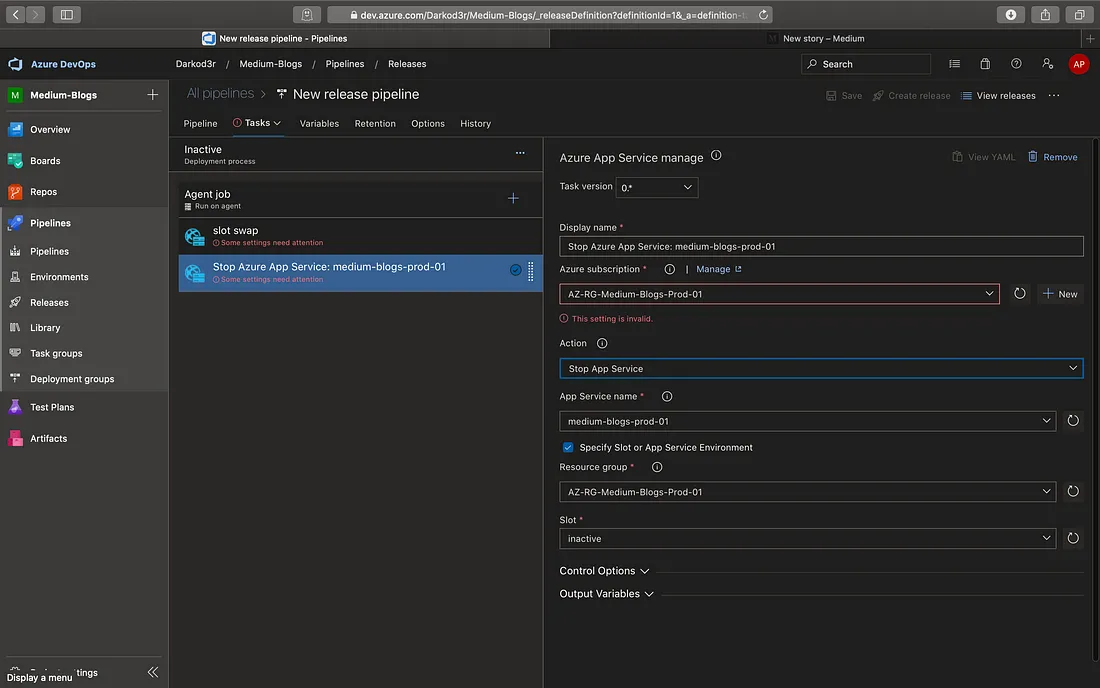
- So, we will stop the canary/inactive slot when not in use i.e after slot swap and start the slot just before deployment in canary/inactive slot.
- Add Azure App Service Manage task before Azure App Service Deploy task and set Action to Start App Service

1. IaC (Infrastructure as Code)- This article is for beginners. If you are already familiar with CI/CD pipelines then multistage YAML pipeline is the way to go.
2. Increasing the Build pipeline performance by using npm-cache ❗❓
3. Use of static code analysis tools like SonarQube in the build pipeline.
4. Build Validation of Pull Requests.
Contact
Etecnest as your trusted IT and Cloud Service Provider. We are dedicated to delivering innovative solutions that propel your business into the digital future. Whether you are seeking robust IT services, comprehensive cloud solutions, or a tailored combination of both, we are here to meet your unique needs.
Our Address
J P Nagar 509 Area Pune 411032
Email Us
info@etecnest.com
Call Us
+91 7875092767
